• Blog
  • Portfolio
  • Landscapes
  • Wildlife
    • Alaska
    • Grand Teton
    • Yellowstone
    • Glacier Park
    • Rock City
    • Lost Lake
    • Memorial Falls
    • Freezout WMA
    • Benton Lake NWR
    • C. M. Russell NWR
  • Astrophotography
  • About
  • Contact
Menu

Josh Rutledge Photography

  • Blog
  • Portfolio
  • Landscapes
  • Wildlife
  • Places
    • Alaska
    • Grand Teton
    • Yellowstone
    • Glacier Park
    • Rock City
    • Lost Lake
    • Memorial Falls
    • Freezout WMA
    • Benton Lake NWR
    • C. M. Russell NWR
  • Astrophotography
  • About
  • Contact
×

A panorama of Grinnell Glacier, along with Upper Grinnell Lake, Salamander Glacier and Gem Glacier.

Hiking to Grinnell Glaicer in Glacier National Park

Joshua Rutledge February 20, 2024

Back in August of 2023 I had the chance to hike to Grinnell Glacier with my wife Denise and younger sister Melissa. My sister and I had hiked to Iceberg Lake earlier in the summer and had debated at that time whether we should hike to Iceberg Lake or Grinnell Glacier. Since we had a chance to get back to Glacier National Park before the summer was over, we thought we would hike to Grinnell Glacier since we did not get to during our previous trip. If you want to check out my blog from our hike to Iceberg Lake you can find it here: Blog - Hiking to Iceberg Lake.

We decided to take the boats across Swiftcurrent Lake and Lake Josephine to cut a few miles off of the hike. We also thought the boat ride just sounded like fun. The boat leaves from out front of the picturesque Many Glacier Hotel. The hotel is designed to look like a Swiss Chalet in the alps. Some of the staff even wear lederhosen to complete the experience. The Many Glacier Hotel is located on the east side of Glacier National Park in the Many Glacier area.

We boarded the boat and were on our way across Swiftcurrent Lake. The early boat we were on is strictly for passengers looking for transportation across the lake. It is a one way trip, you do get a ticket to ride back later, you just can’t stay on the boat that first trip, you have to disembark. They do not do a full tour of the lake since it is just for transportation purposes. They do give some information on the ride over, but if you want an actual tour of the lake with more commentary, you would want to book one of those tours later in the day. You can reserve your tickets online ahead of time and I would highly recommend you do so. You do have the option to buy tickets at the booth the day of, but there is no guarantee they will have any available.

They drop you off at the dock on the far end of Swiftcurrent Lake and then there is a short quarter of a mile or so hike over the ridge to another dock on Lake Josephine. The hike is not too bad, but it can be a little rough, so if you are traveling with someone with mobility issues, this could be a problem. If I am not mistaken, the ridge between Swiftcurrent Lake and Lake Josephine is actually a glacier moraine. From there you board another boat and it takes you across to another dock on the far end of Josephine Lake. There is a small covered structure and some pit toilets near the dock. This dock serves as a pickup point for hikers coming back, so they provide the structure so there is somewhere you can sit and get out of the elements waiting for your return boat ride. There are pickups and drop offs scheduled throughout the day depending on how busy the tour boat schedule is. The last boat of the day continues to go back and forth until all of the passengers are picked up, so don’t panic if you don’t get on the first boat going back. If you do return too late and miss the last boat of the day however, you will have to hike the 2 miles or so back to the hotel (or wherever you started from.)

If you don’t want to take the boat rides, you can start your hike at the Many Glacier Hotel or there is also a parking lot between the Many Glacier Hotel and the Swiftcurrent Motor Inn that is also a popular jumping off spot. I believe either of these options adds about 2 miles both ways to your hike. So what is a 6 mile or so hike with the boats becomes over a 10 mile hike without. If you just want a nice easy hike around one or both lakes without hiking to the glacier, that is a great option too. You can also hike to Grinnell Lake instead of the glacier and this is a relatively easy hike as well. The hike to Grinnell Lake also leaves from the end of Josephine Lake.

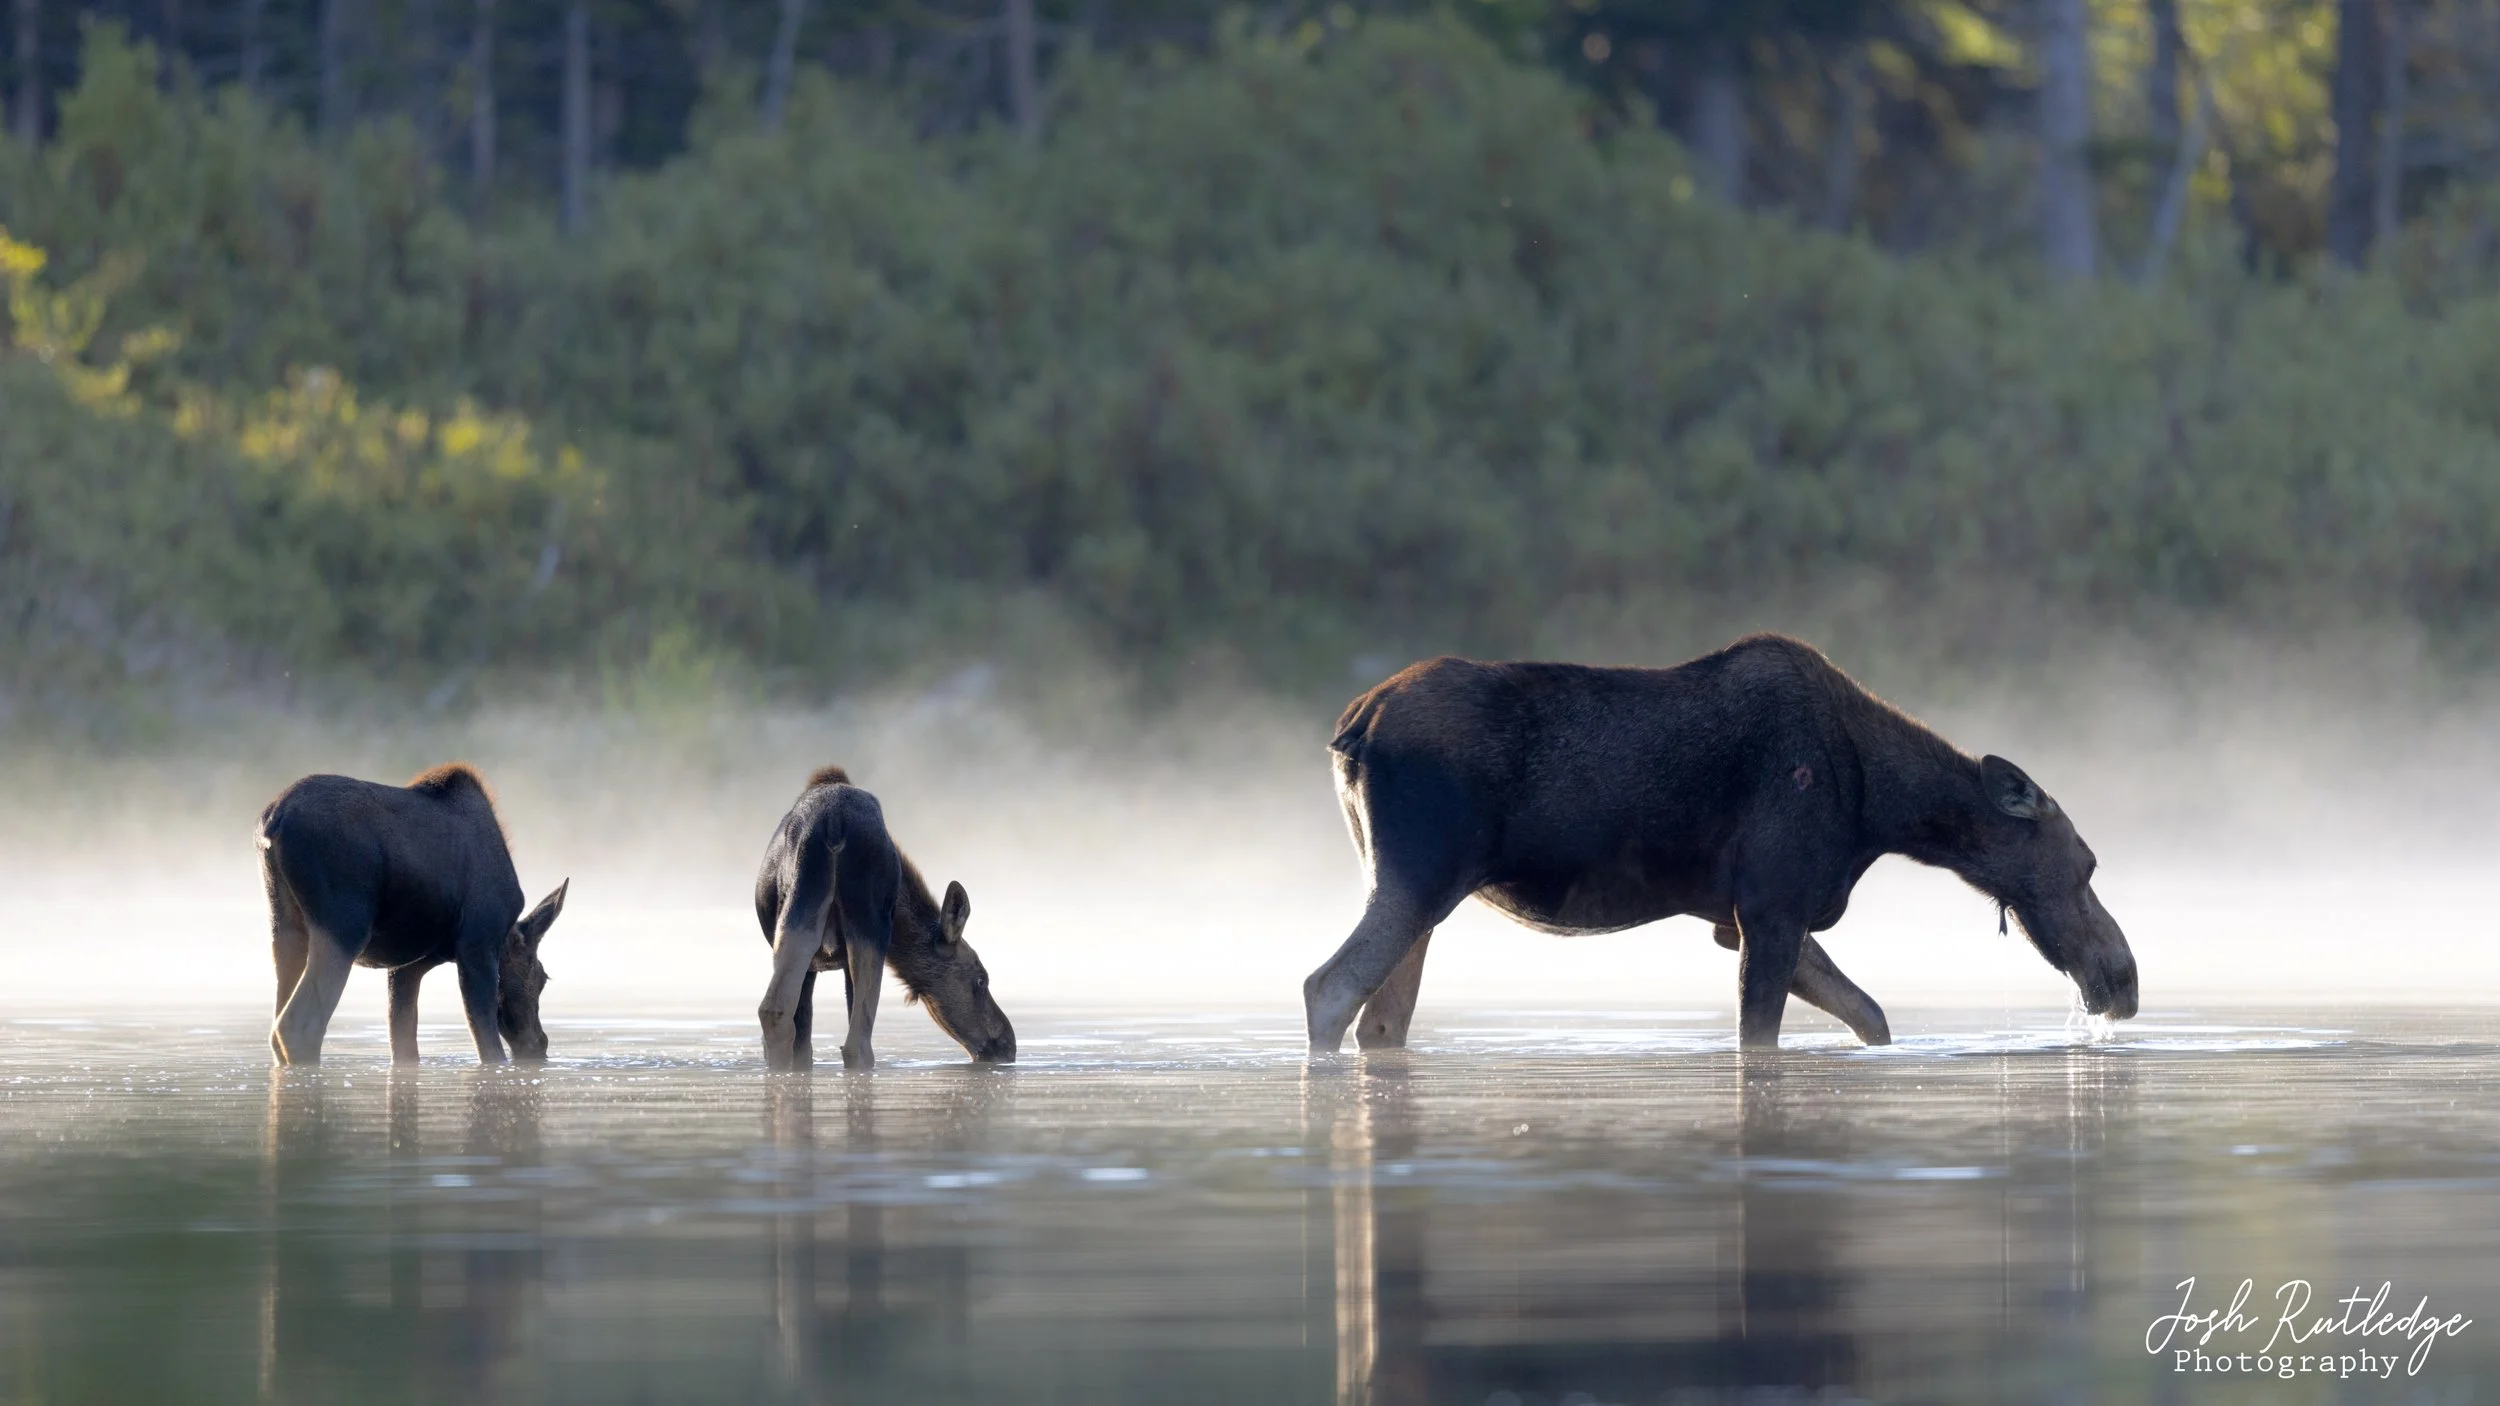
Injured cow moose in the marshy area of Lake Josephine in Glacier National Park.

When we got dropped off to start our hike there was a wounded cow moose in the swampy area at the end of the lake. We can’t be sure, but my guess would be she may have had a run in with a grizzly bear. Both moose and grizzly bears are common in this area, so you will want to remember to bring your bear spray. The hike starts by crossing this swampy area at the end of the lake. If you keep going straight, you will go to Grinnell Lake. There is a foot bridge that crosses the main channel of the creek and then there are some boardwalks that help navigate you over the swampy areas. There is then a steep climb up the mountain that eventually connects with the main trail along the lake people use if they don’t take the boat. There are some great views of Josephine Lake once you make that initial climb.

First view of Grinnell Lake as you are hiking to Grinnell Glacier in Glacier National Park.

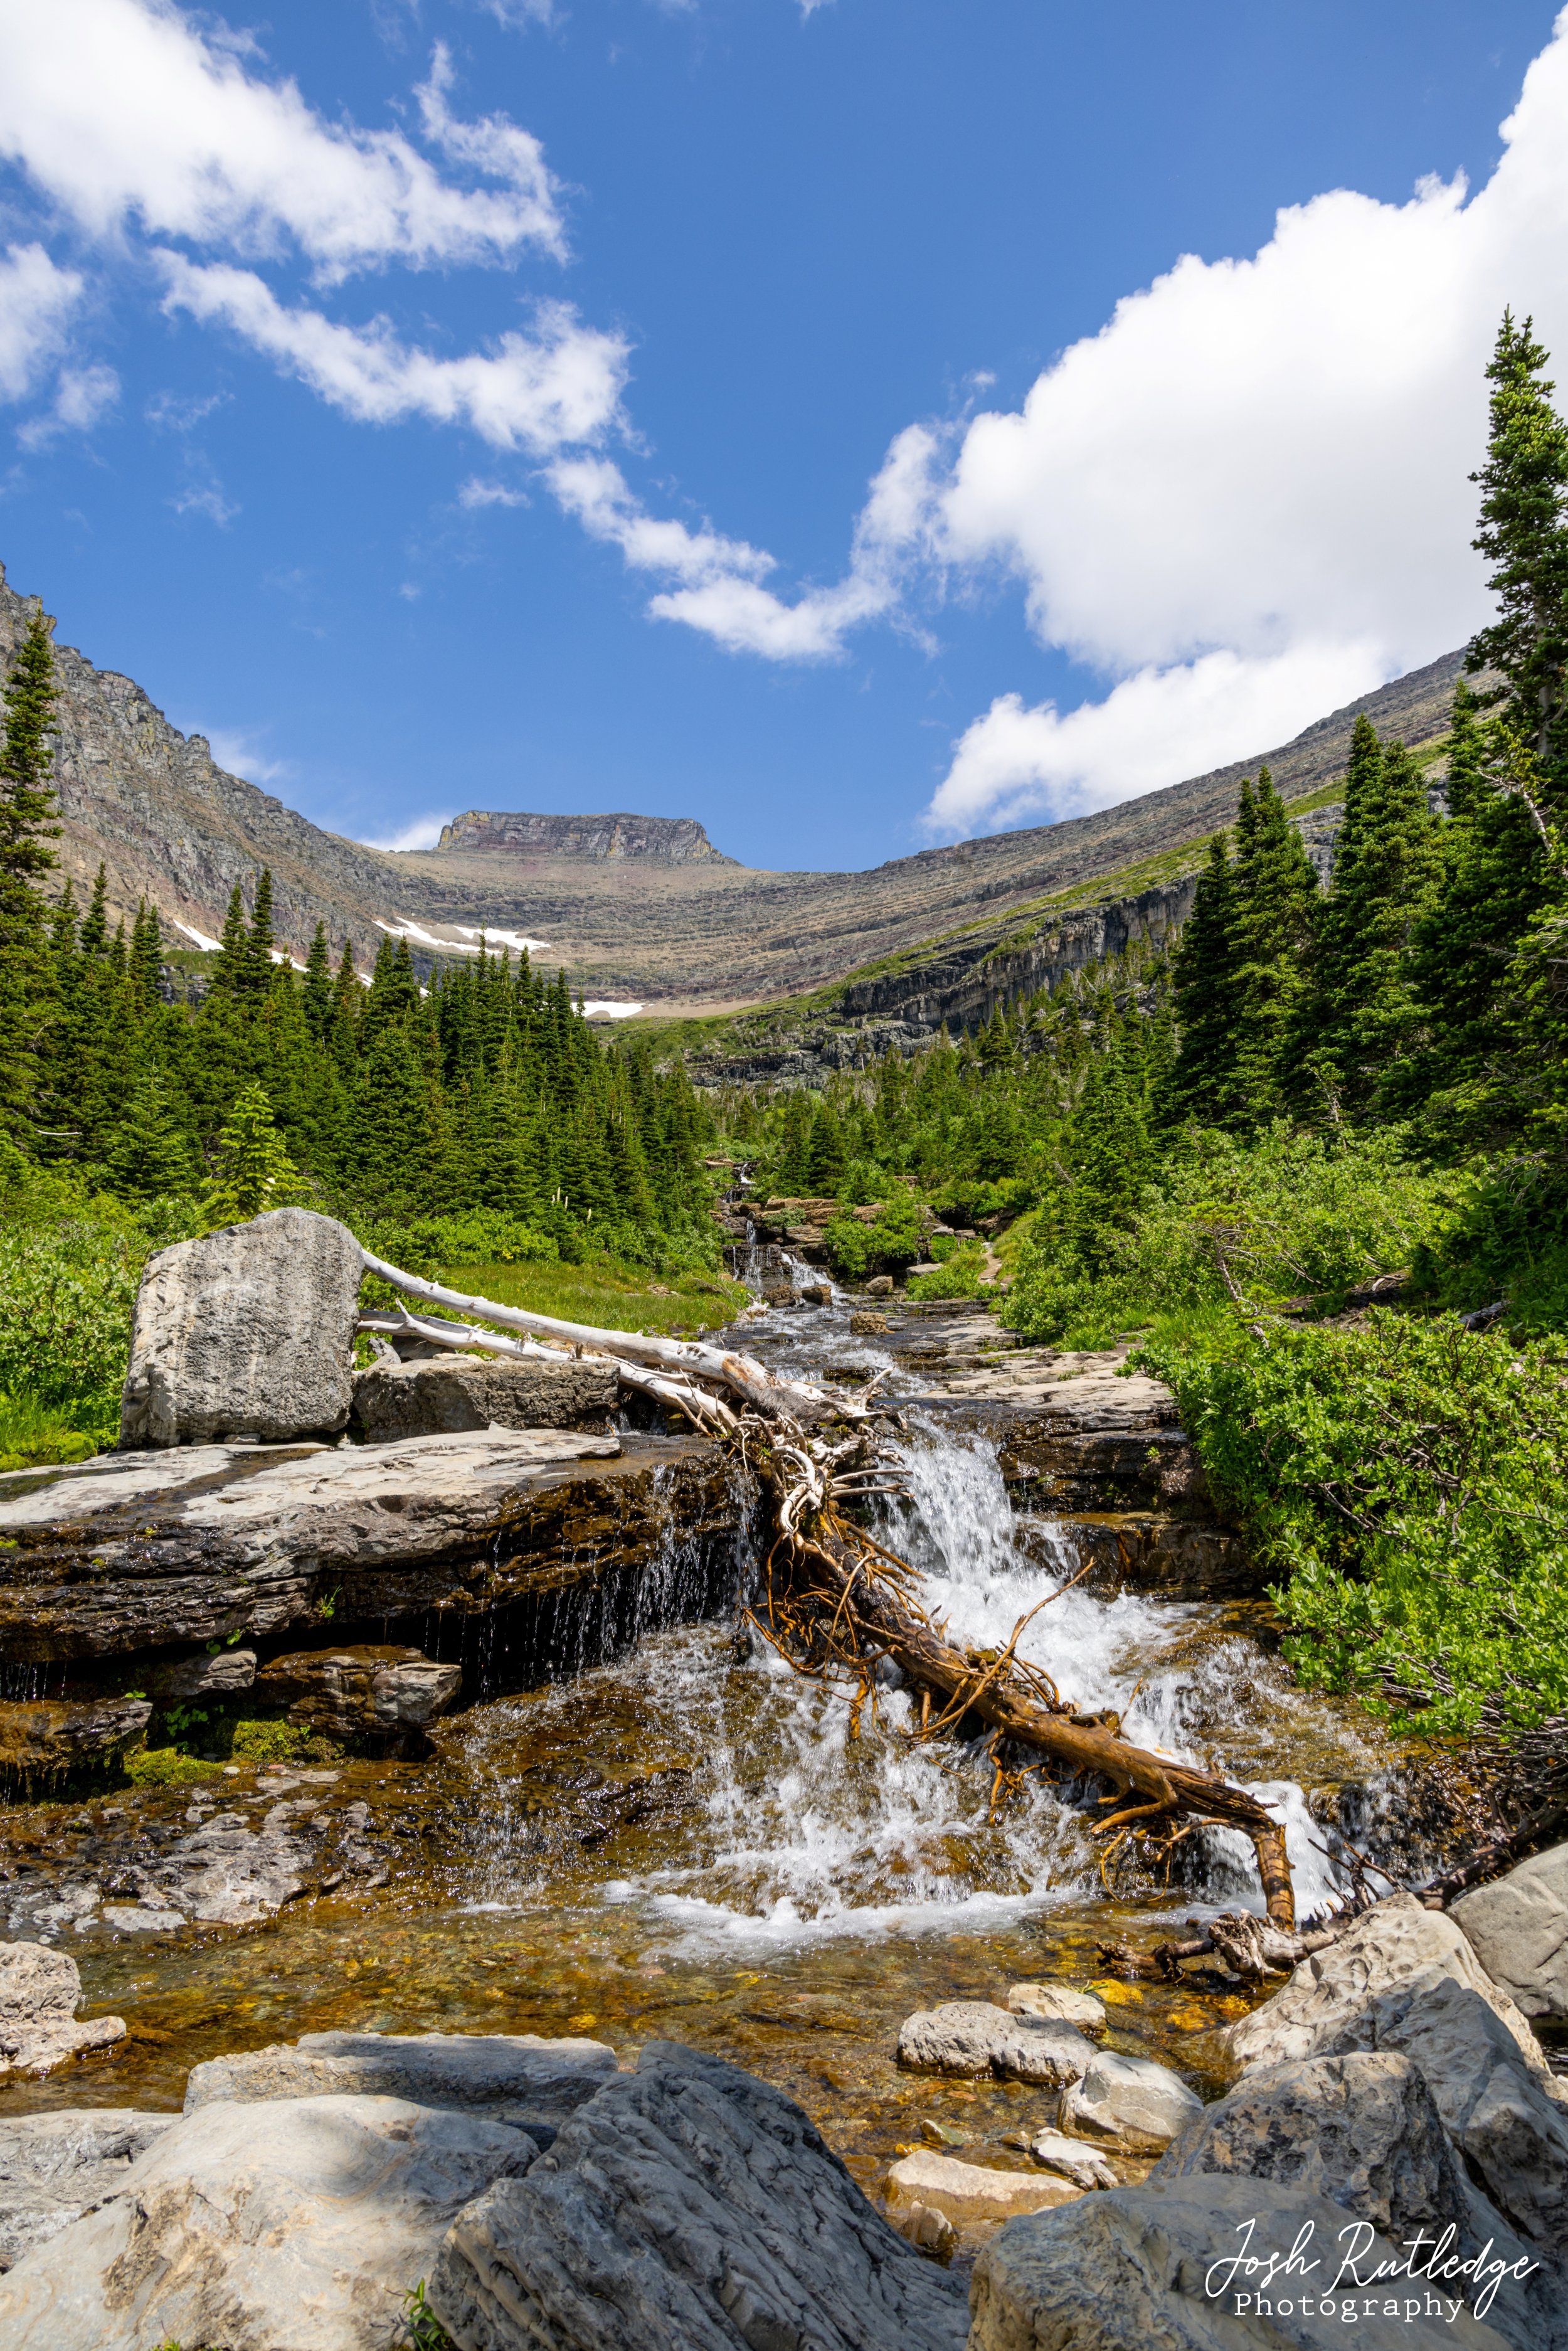
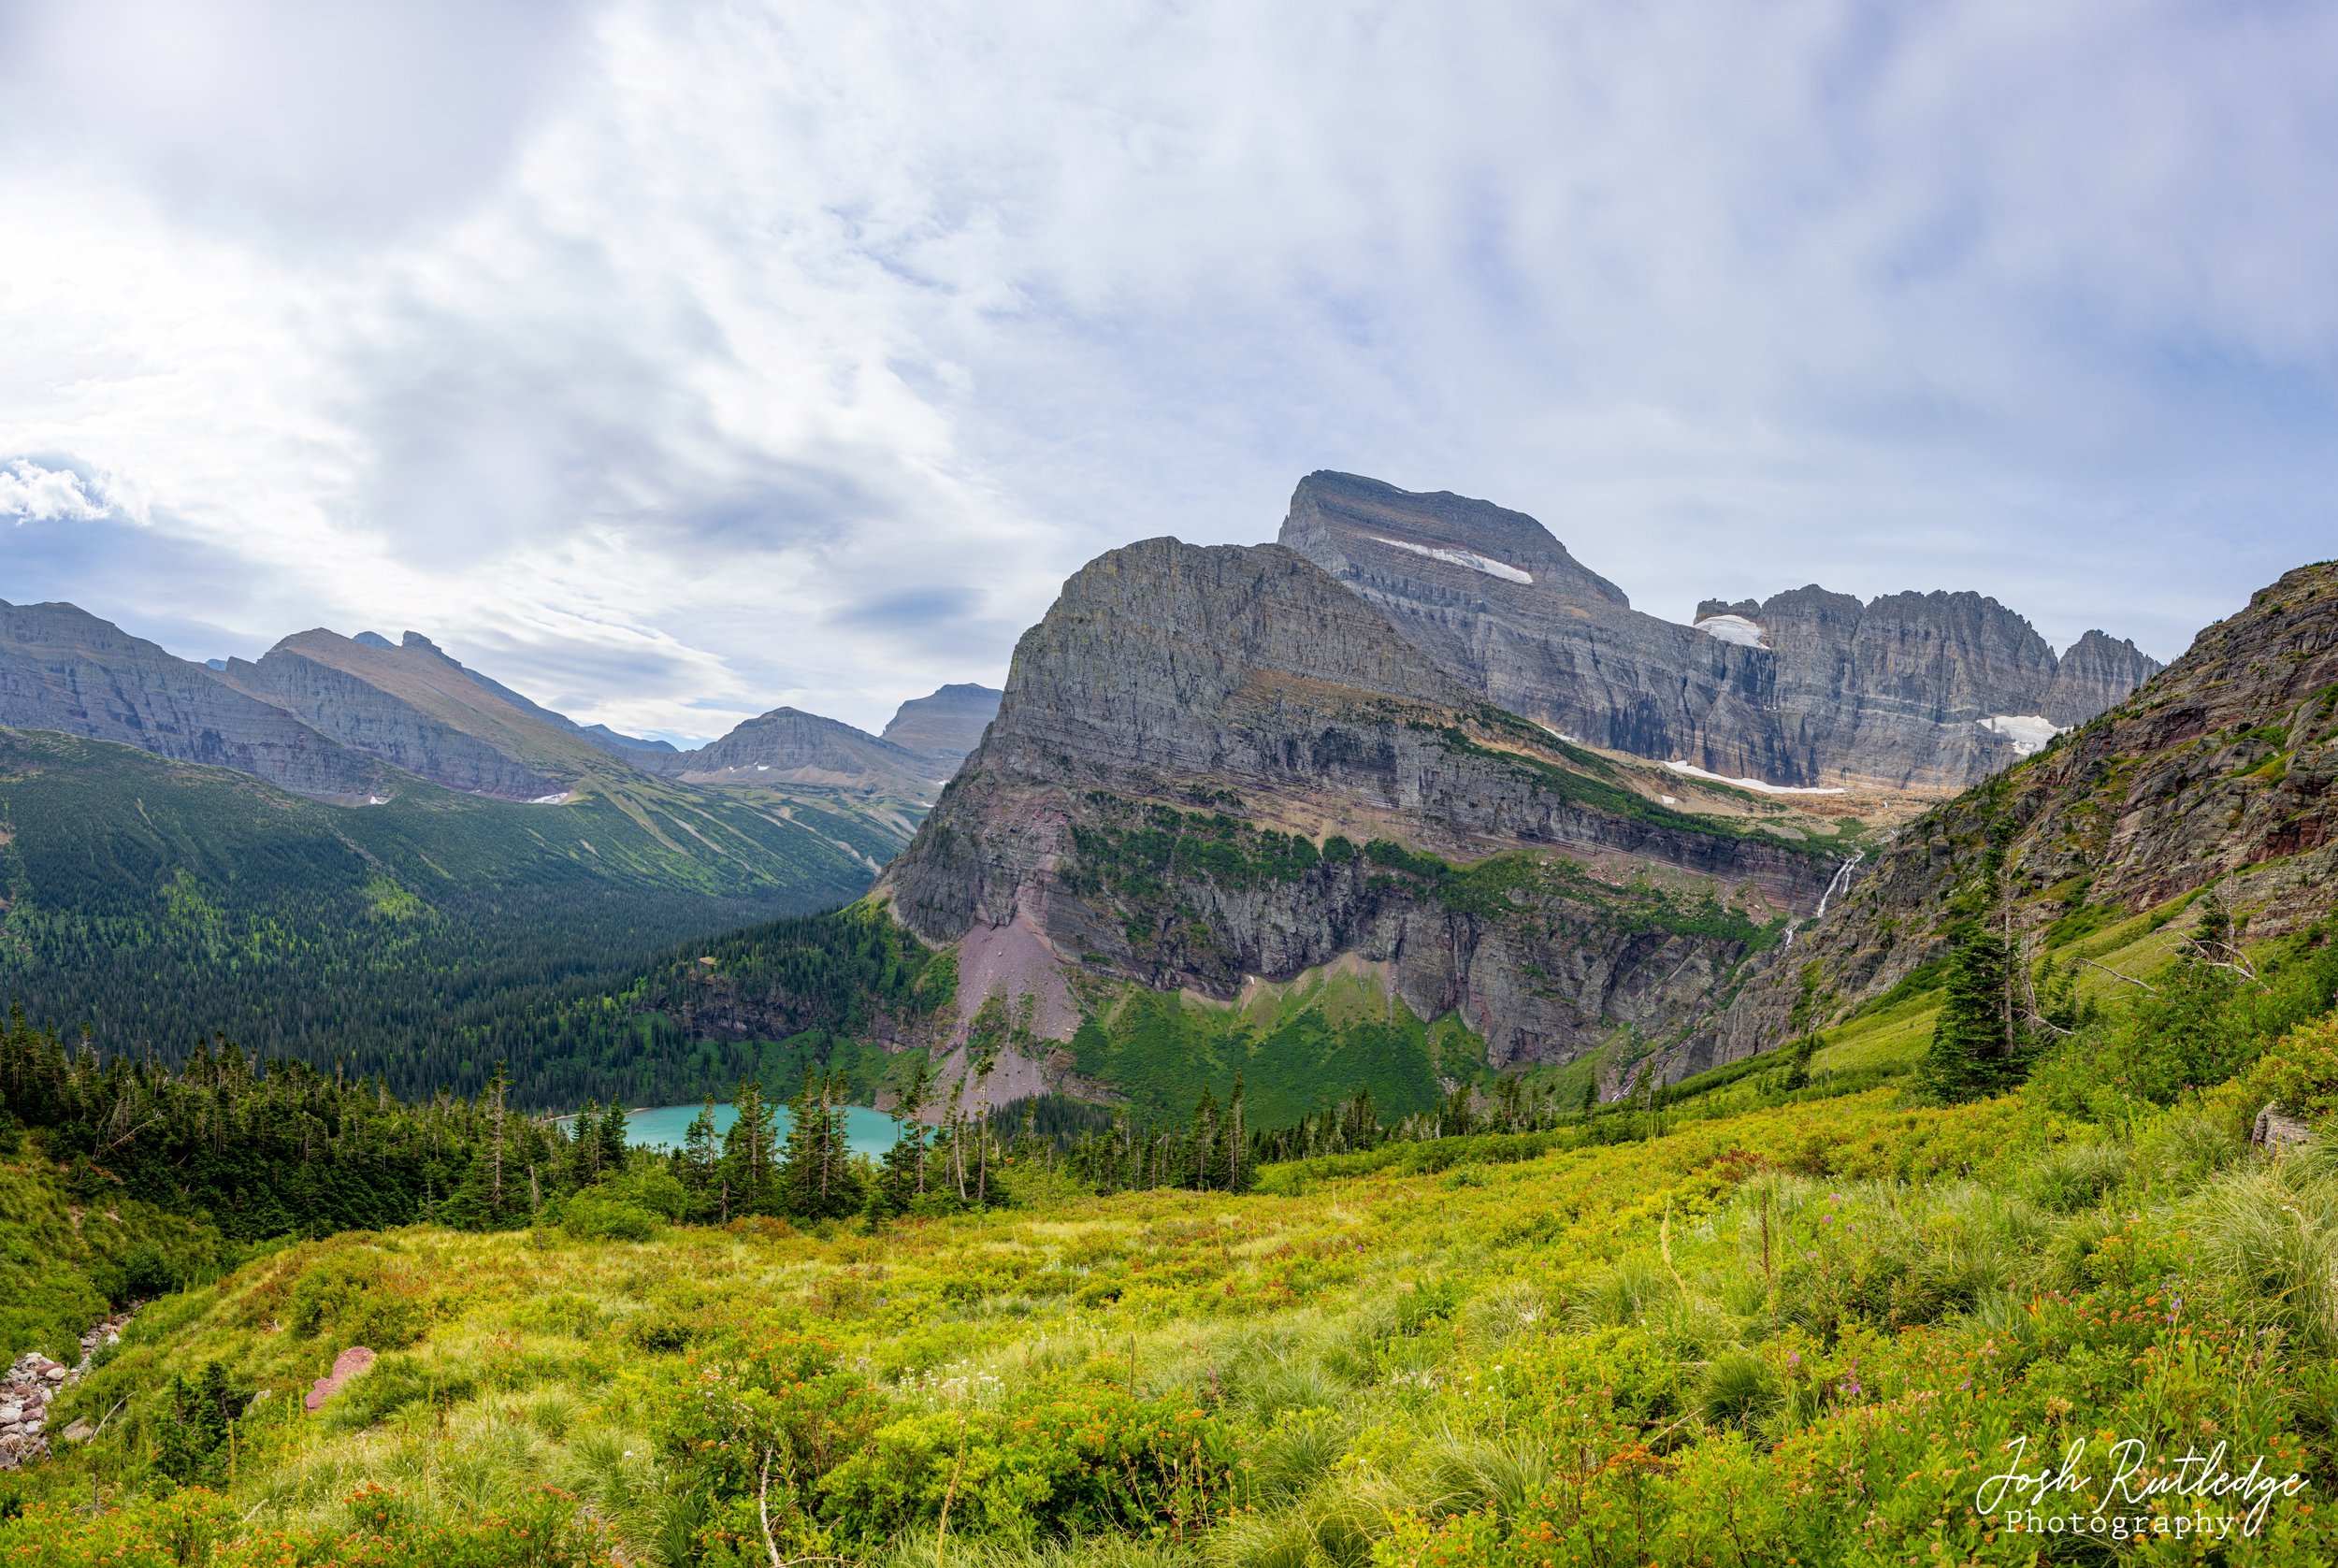
As you continue up the trail you continue to climb and eventually you will get your first glimpse of Grinnell Lake. From there you can also see the Salamander Glacier and the waterfall that comes out of Upper Grinnell Lake. You can’t quite see Grinnel Glacier from this vantage however. The hike continues up the side of the mountain and you work your way higher and higher above Grinnell Lake until you are eventually looking almost straight down on it. This hike, while shorter than Iceberg Lake, is a lot more strenuous as you are continually climbing. There are a couple of stretches that are pretty steep. There are also some stretches that are along cliff faces, so if you are afraid of heights, this might not be the best hike for you.

A view Grinnell Falls, Grinnell Glacier and a field of fireweed and other wildflowers.

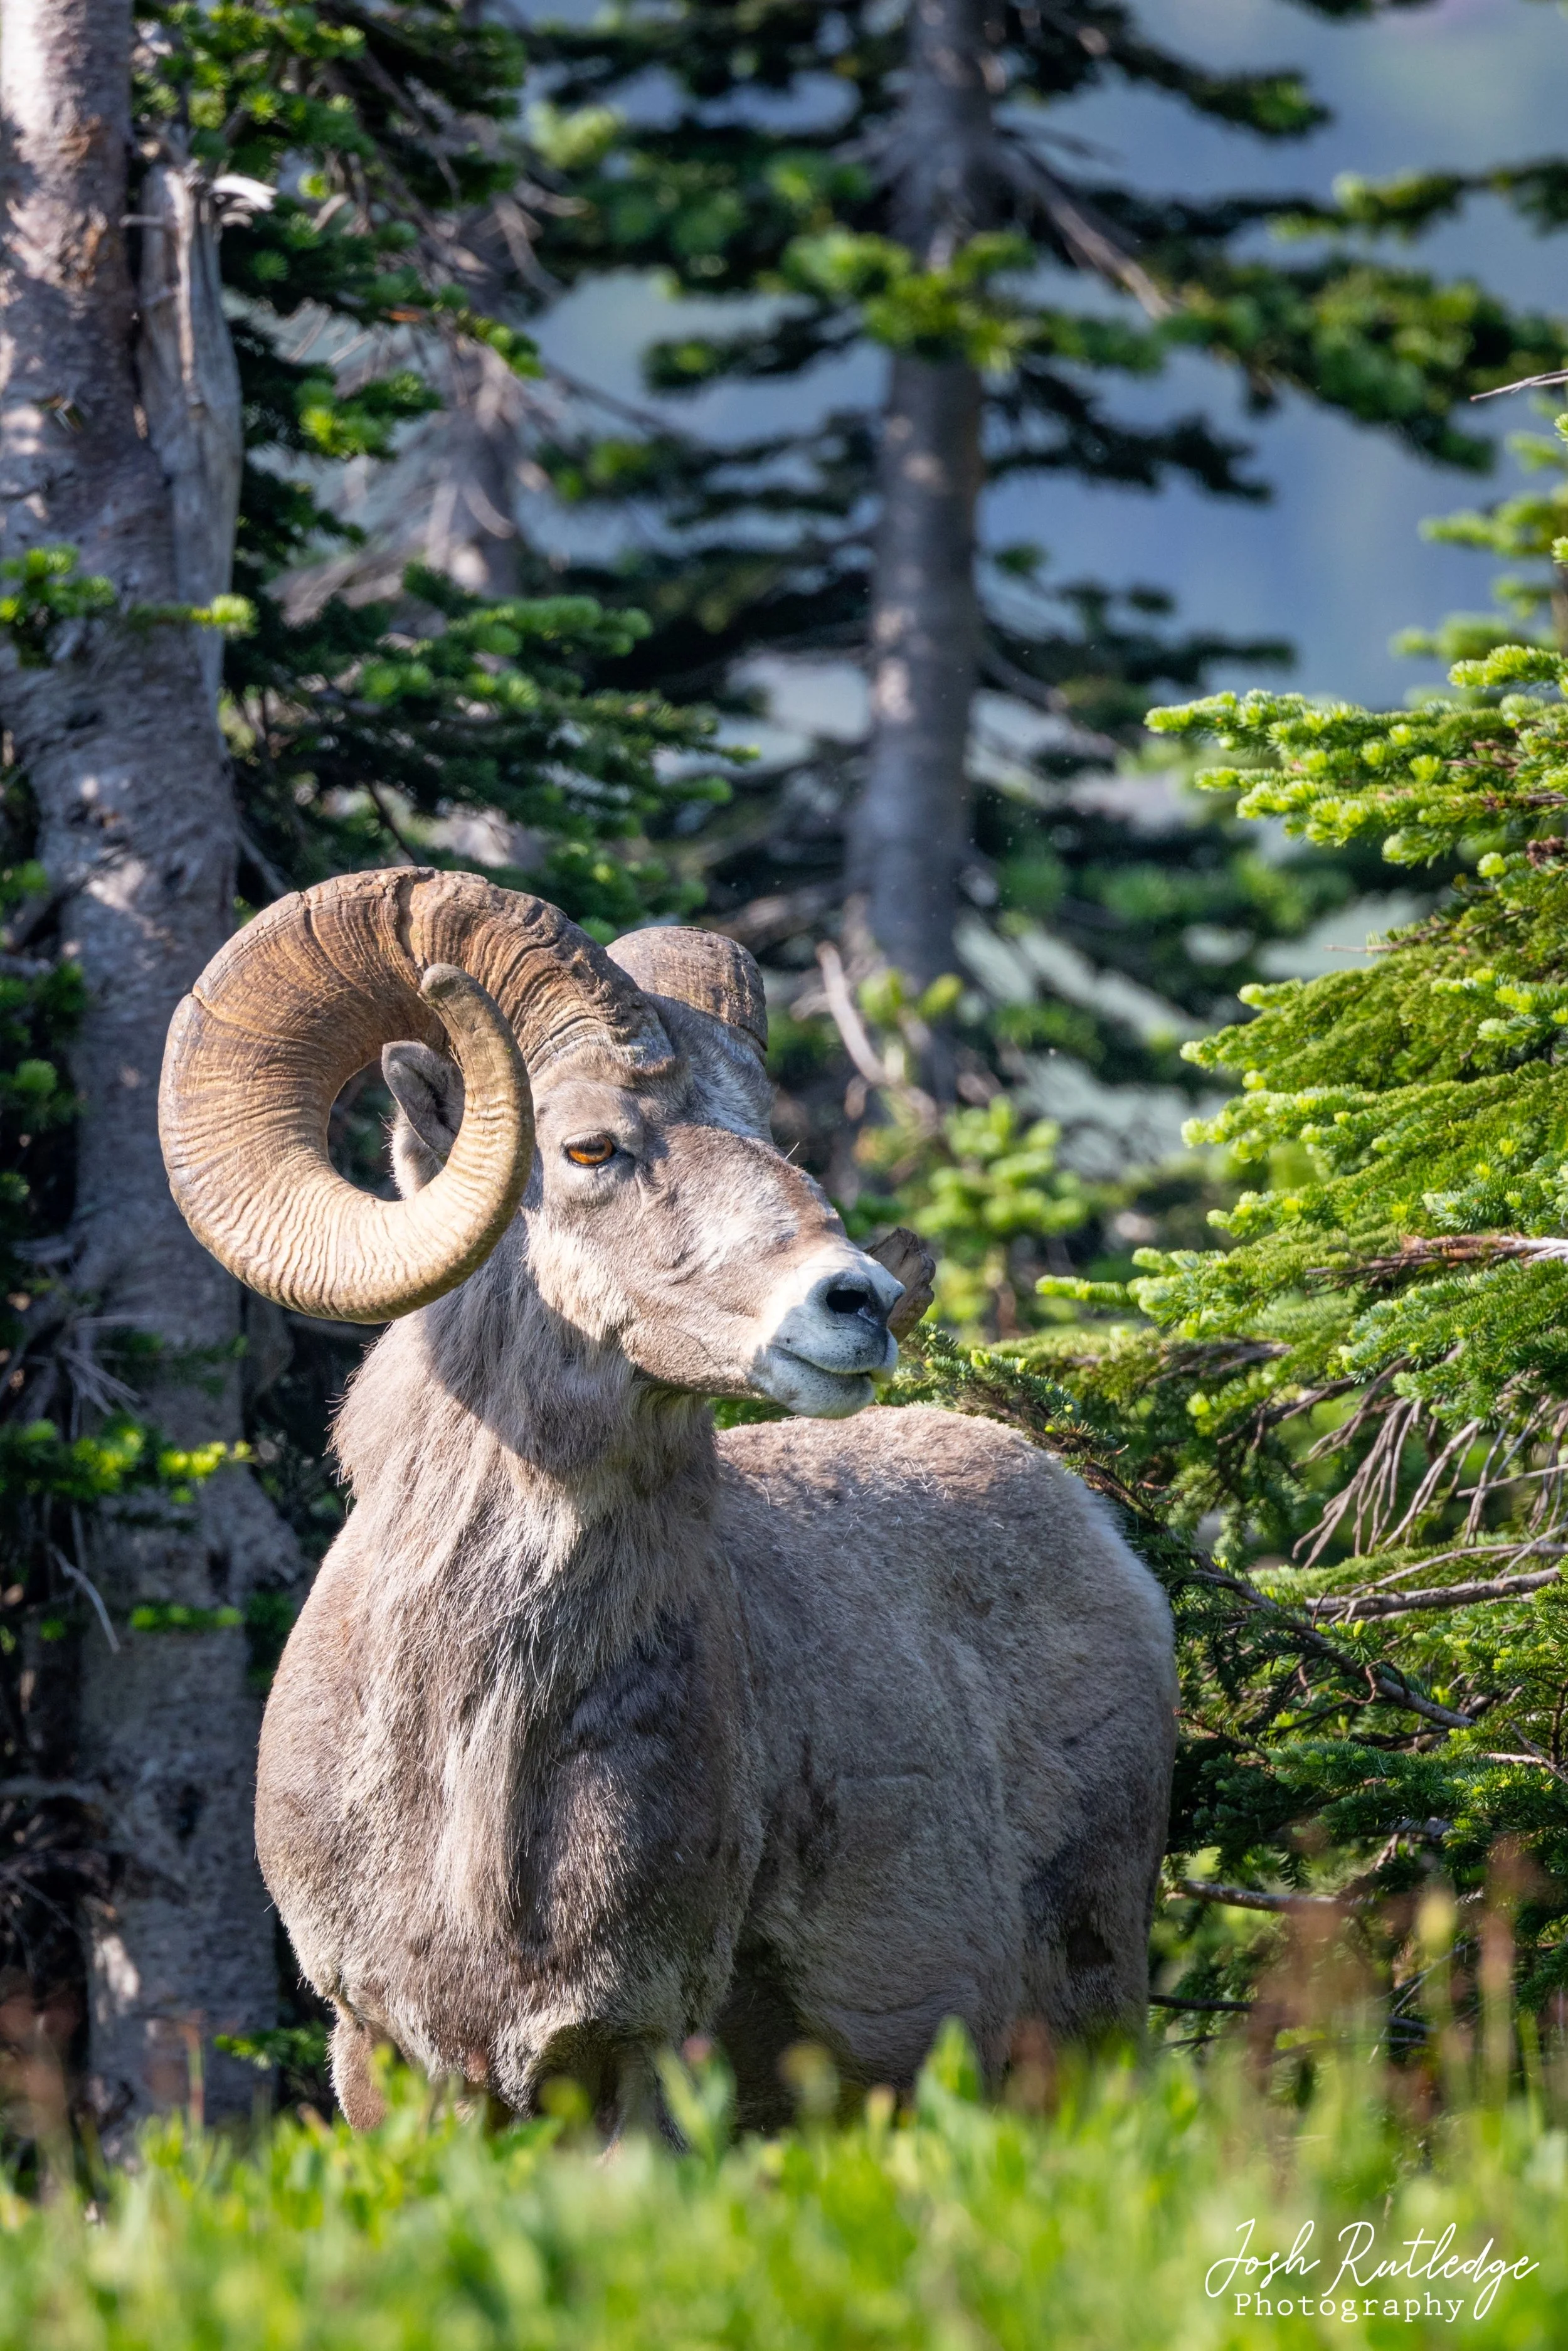
At one point along the hike we got stopped by a group of bighorn sheep rams that were licking the salts off the cliffs near a waterfall that the trail runs under. I was honestly not bothered at all by the delay as it was a lot of fun to watch the bighorn sheep. I was happy I brought my 100-500 lens as I was able to get some pretty good shots of the rams. Eventually they did move off the trail and we were able to continue on our hike. You can select each image in the gallery below for a larger view.

View fullsize 6D6A8056.jpg
View fullsize 6D6A8124.jpg
View fullsize 6D6A8130.jpg
View fullsize 6D6A8132.jpg

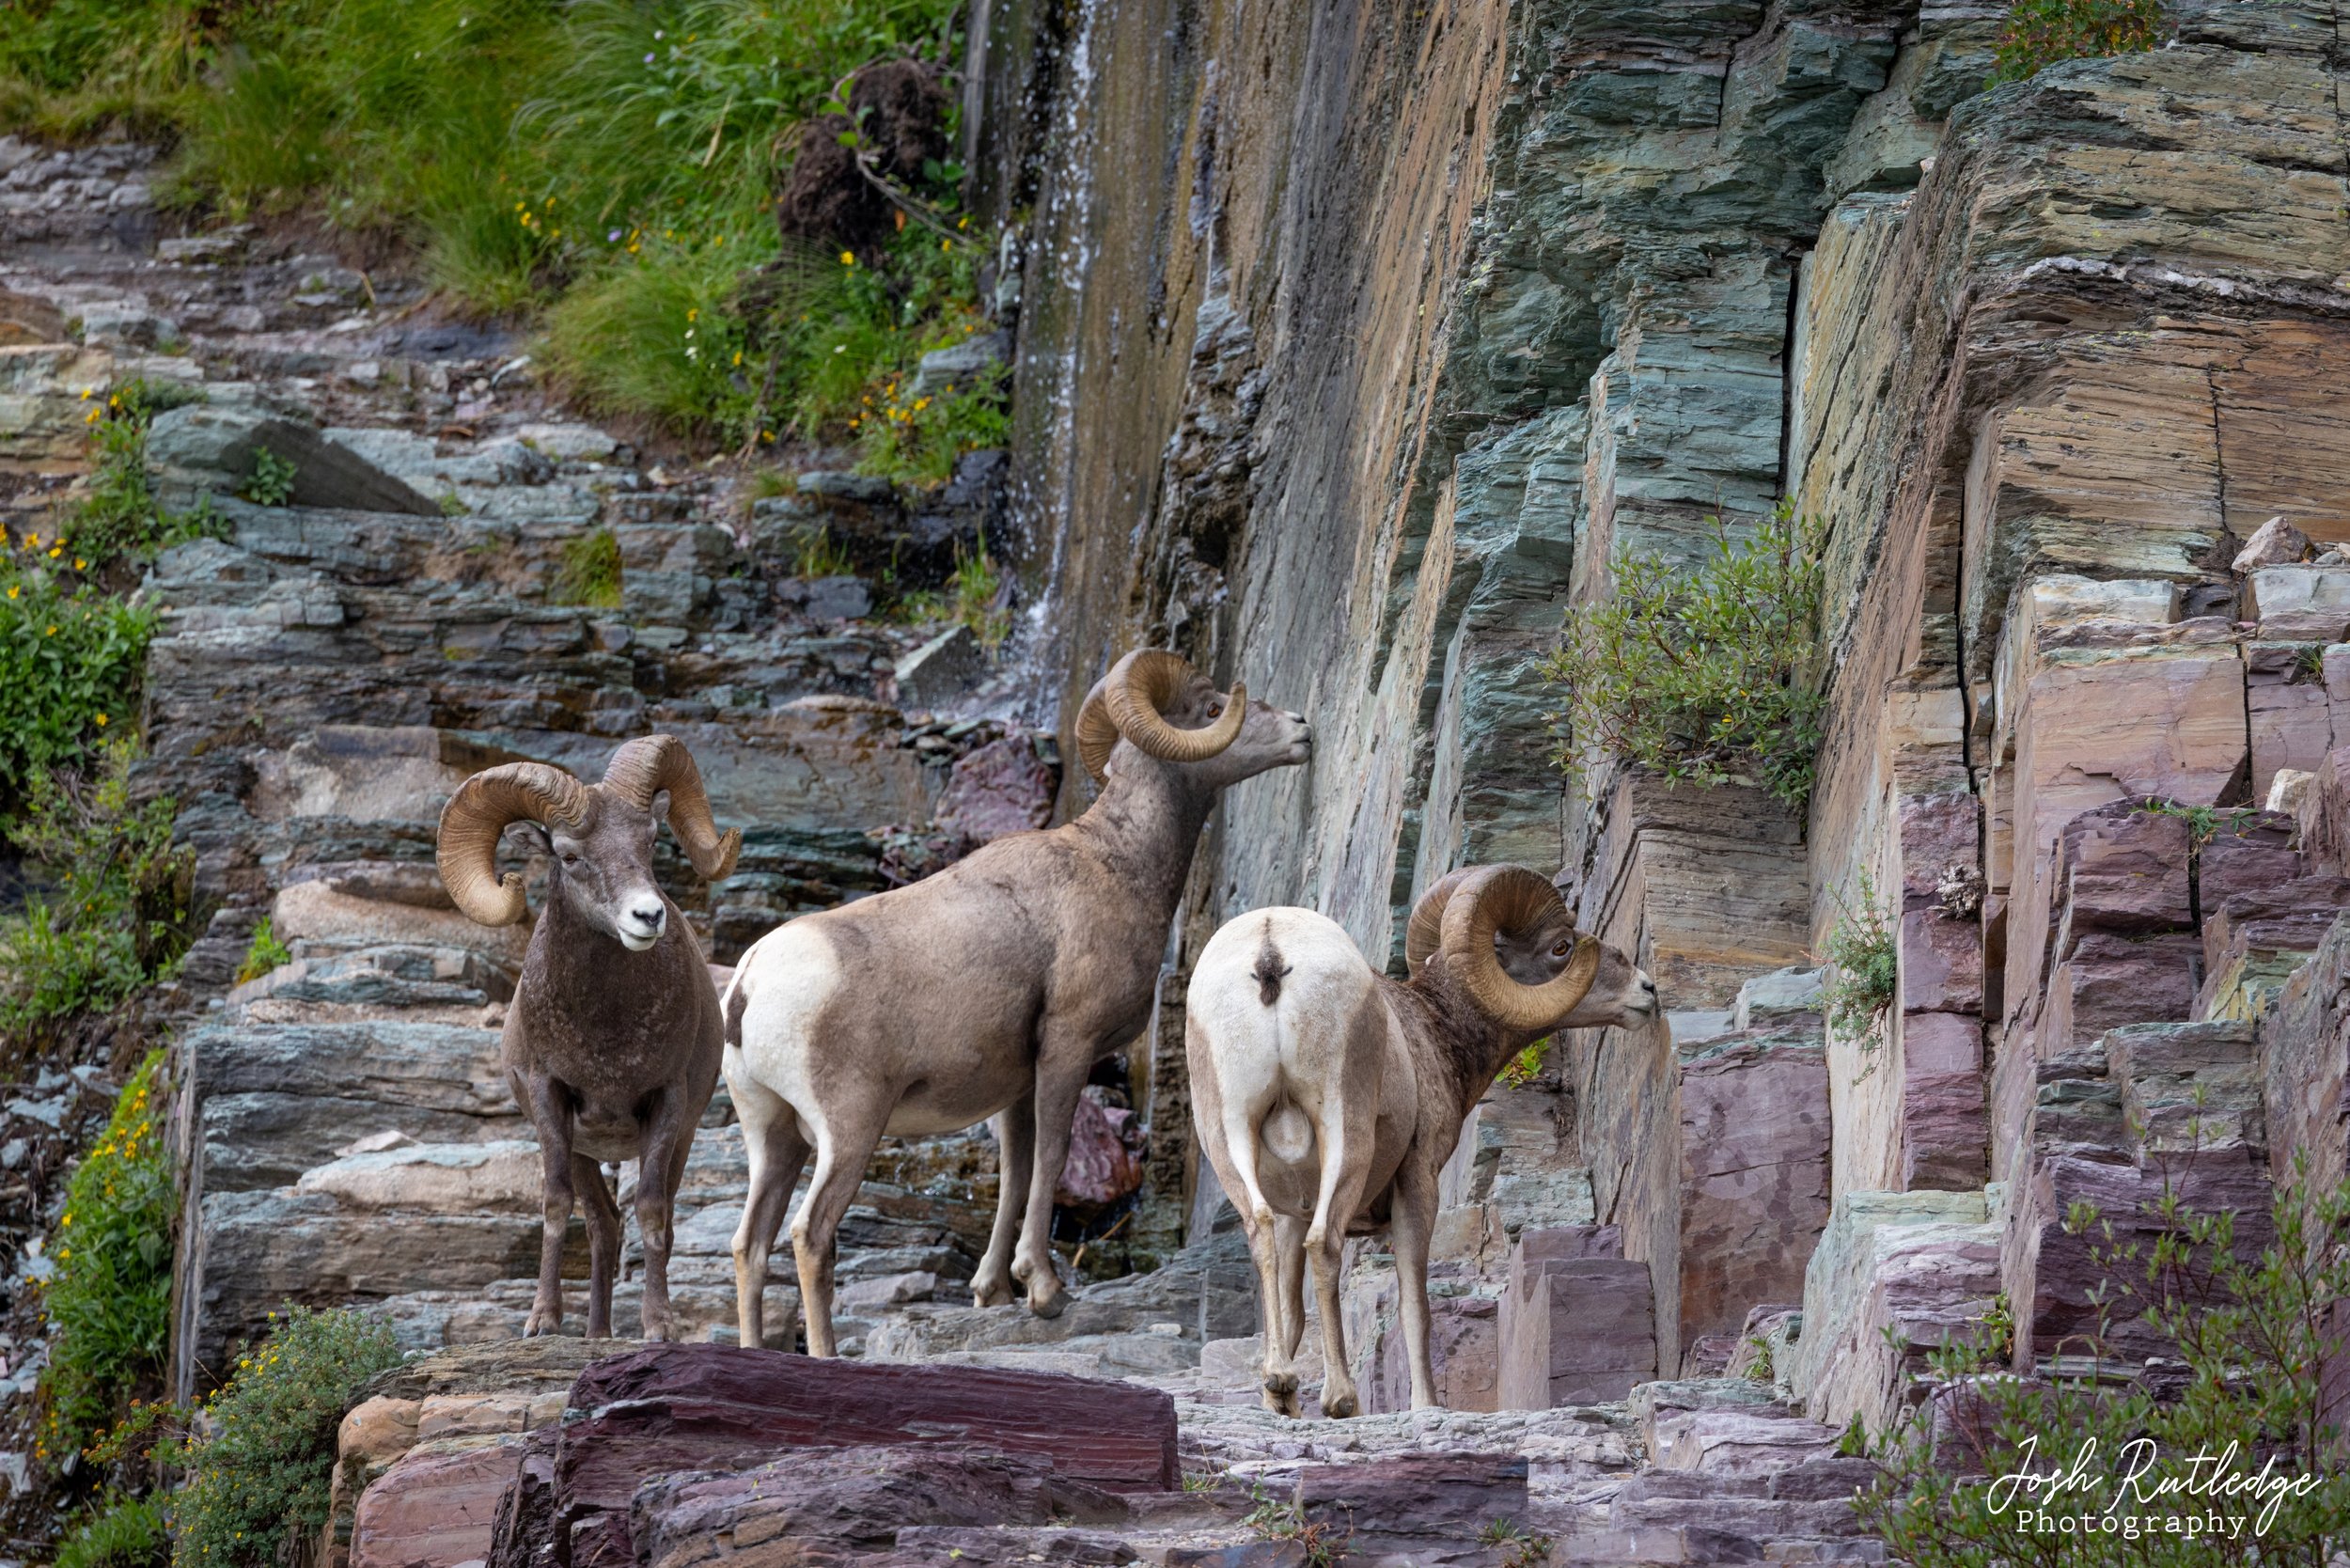
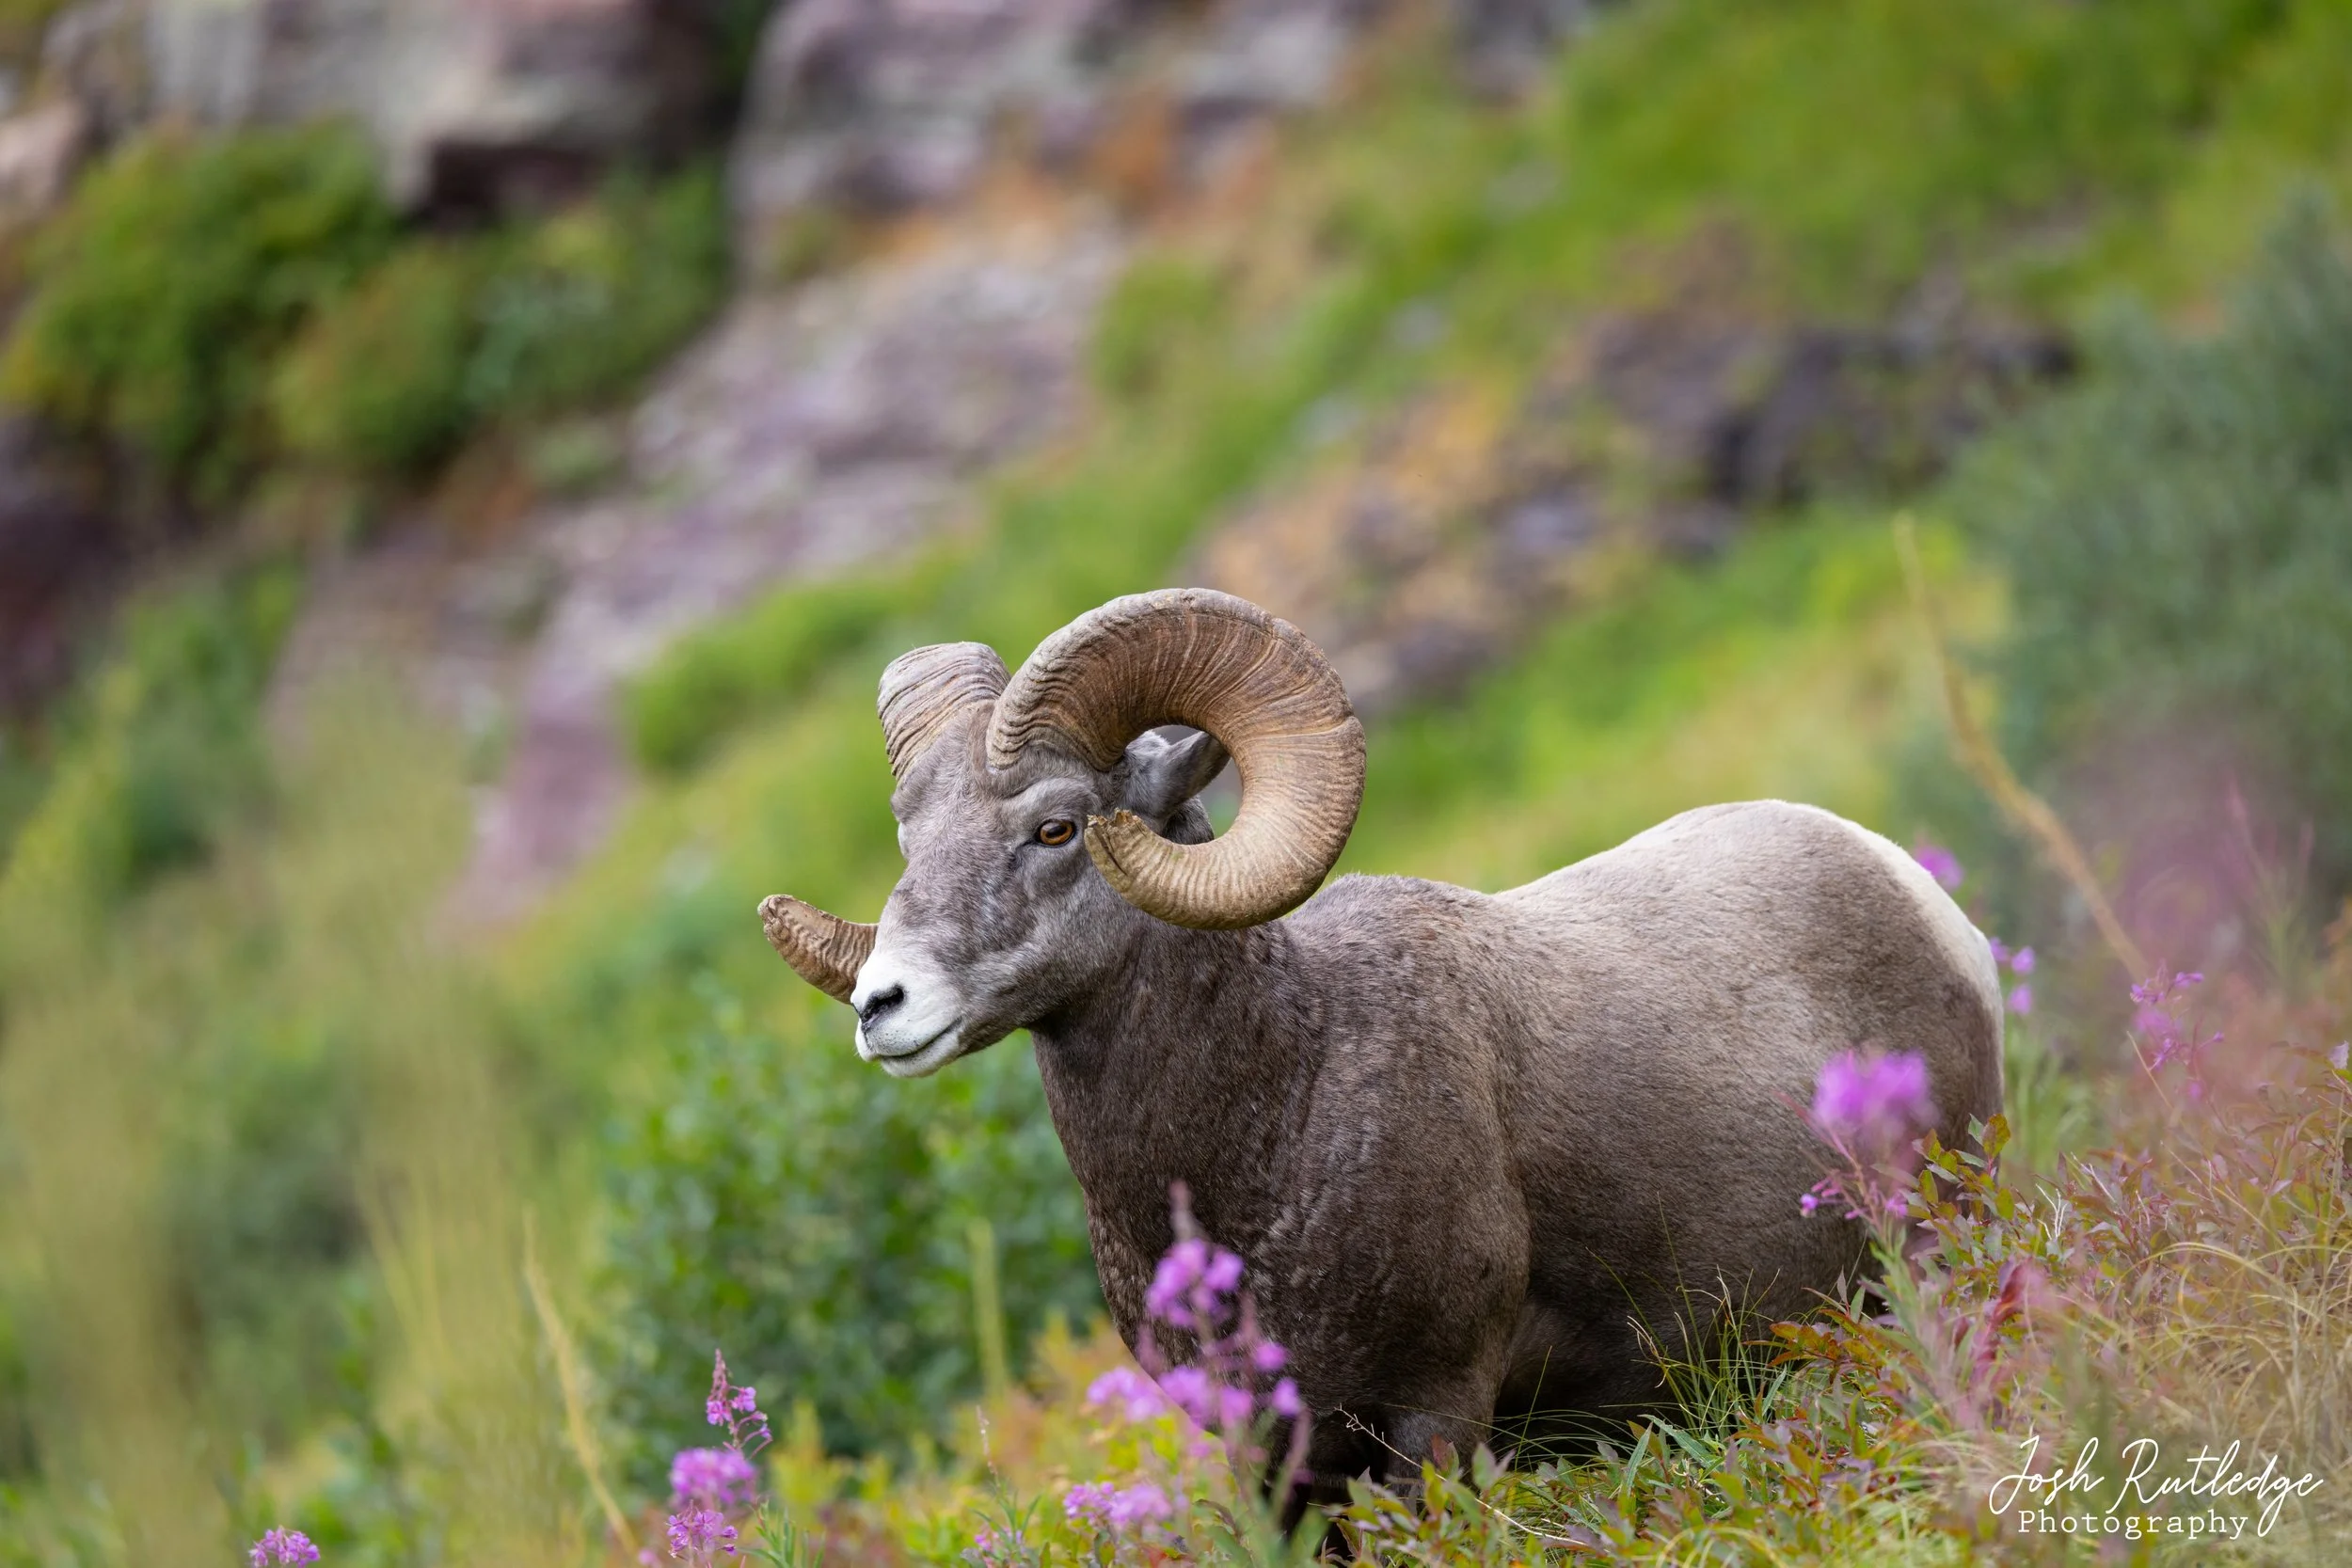
Before you reach the last climb up to Grinnell Glacier, there is a flat area with some benches and a couple of primitive pit toilets. We encountered a couple more bighorn sheep in this area. As I mentioned, there is a pretty steep climb from the rest area up to the area of Upper Grinnell Lake and Grinnell Glacier. When you are on top you are greeted with an amazing view of Upper Grinnell Lake below you, the Grinnell Glacier, Salamander Glacier and Gem Glacier. And if you turn around behind you, you can see Grinnell Lake, Lake Josephine and Lake Sherburne in the distance. Being able to see 4 lakes from one location is pretty awesome. Unfortunately you can’t see Swiftcurrent Lake as it is tucked behind the mountain.

A view of Grinnell Lake, Lake Josephine and Lake Sherburne.

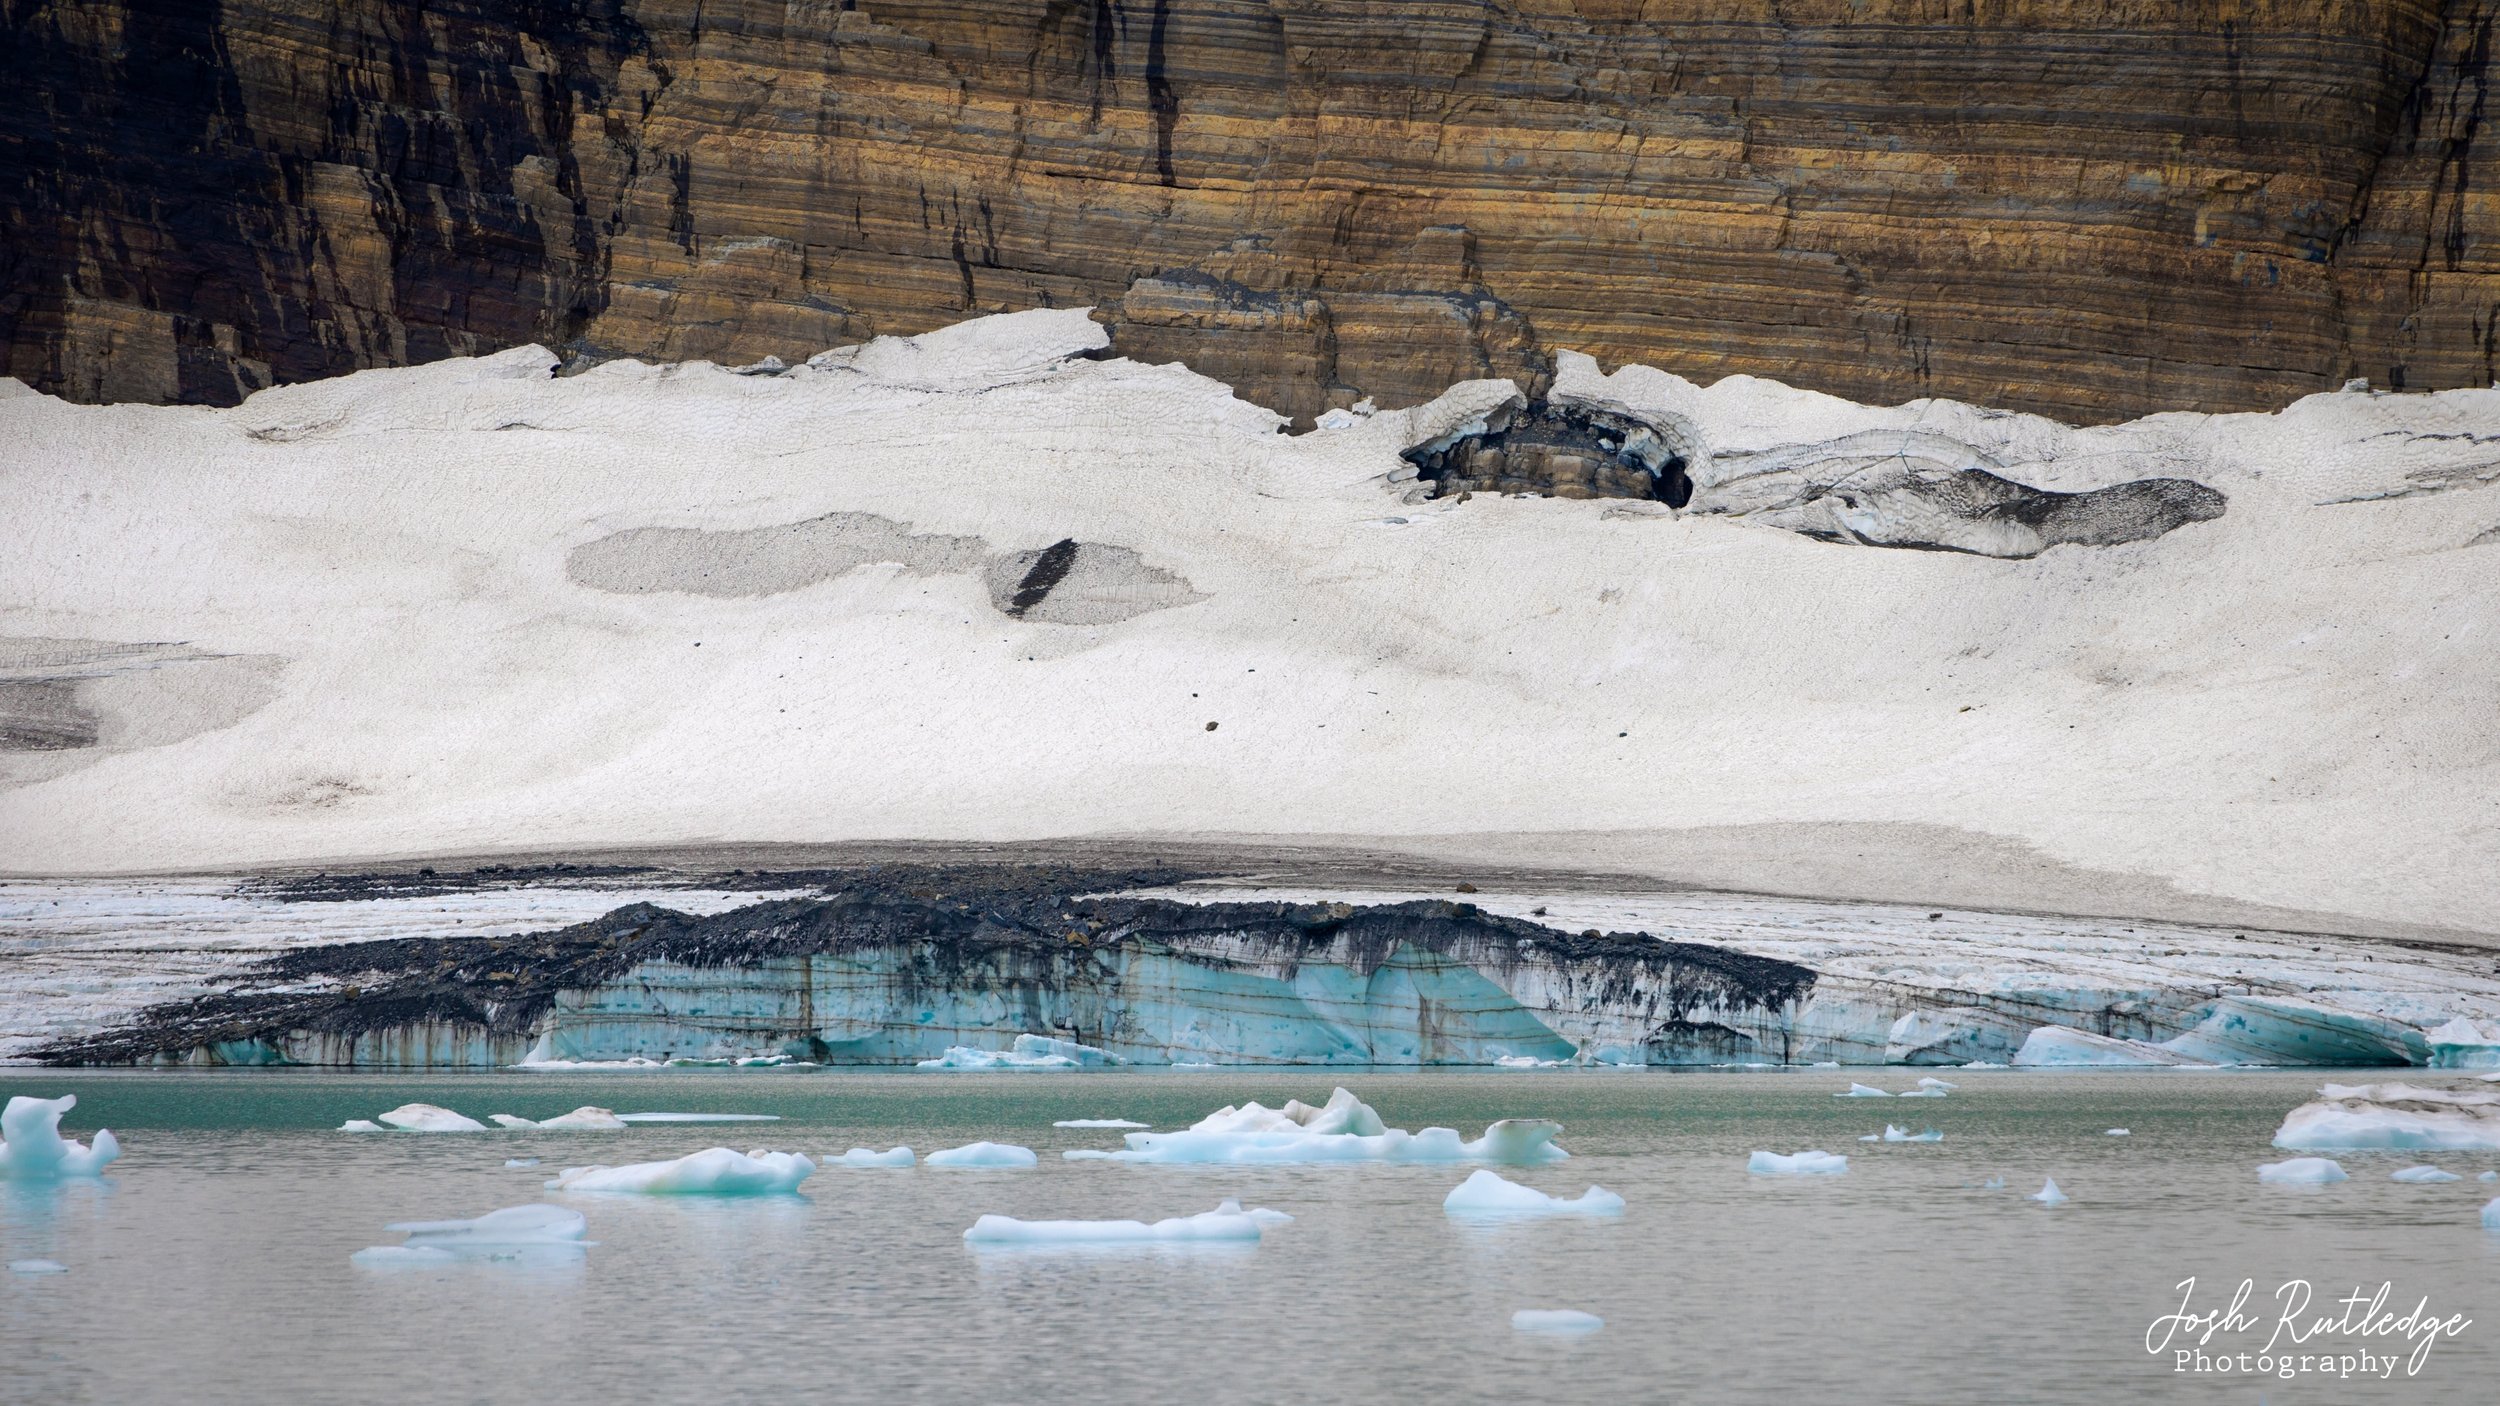
There is then a short hike down to Upper Grinnell Lake. The landscape here is very interesting. Since the glacier is still receding, it has left a barren rocky landscape in its wake. You can see where the rock has been ground away by the ice. Since the glacier has become very unstable they don’t recommend you actually go out on it anymore. So we did not. We did see a few brave souls out on it however. As I mentioned, besides Grinnell Glacier, you can also see Salamander Glacier, with an amazing waterfall down into Upper Grinnell Lake and the Gem Glacier as well. The cliffs behind the lake make up part of the famous Garden Wall. If you have gone over Logan Pass on the Going to the Sun Road, you have seen the other side of the Garden Wall, or maybe you have even hiked in this area before.

A panorama of Grinnell Glacier, Upper Grinnell Lake, Gem Glacier and Salamander Glacier.

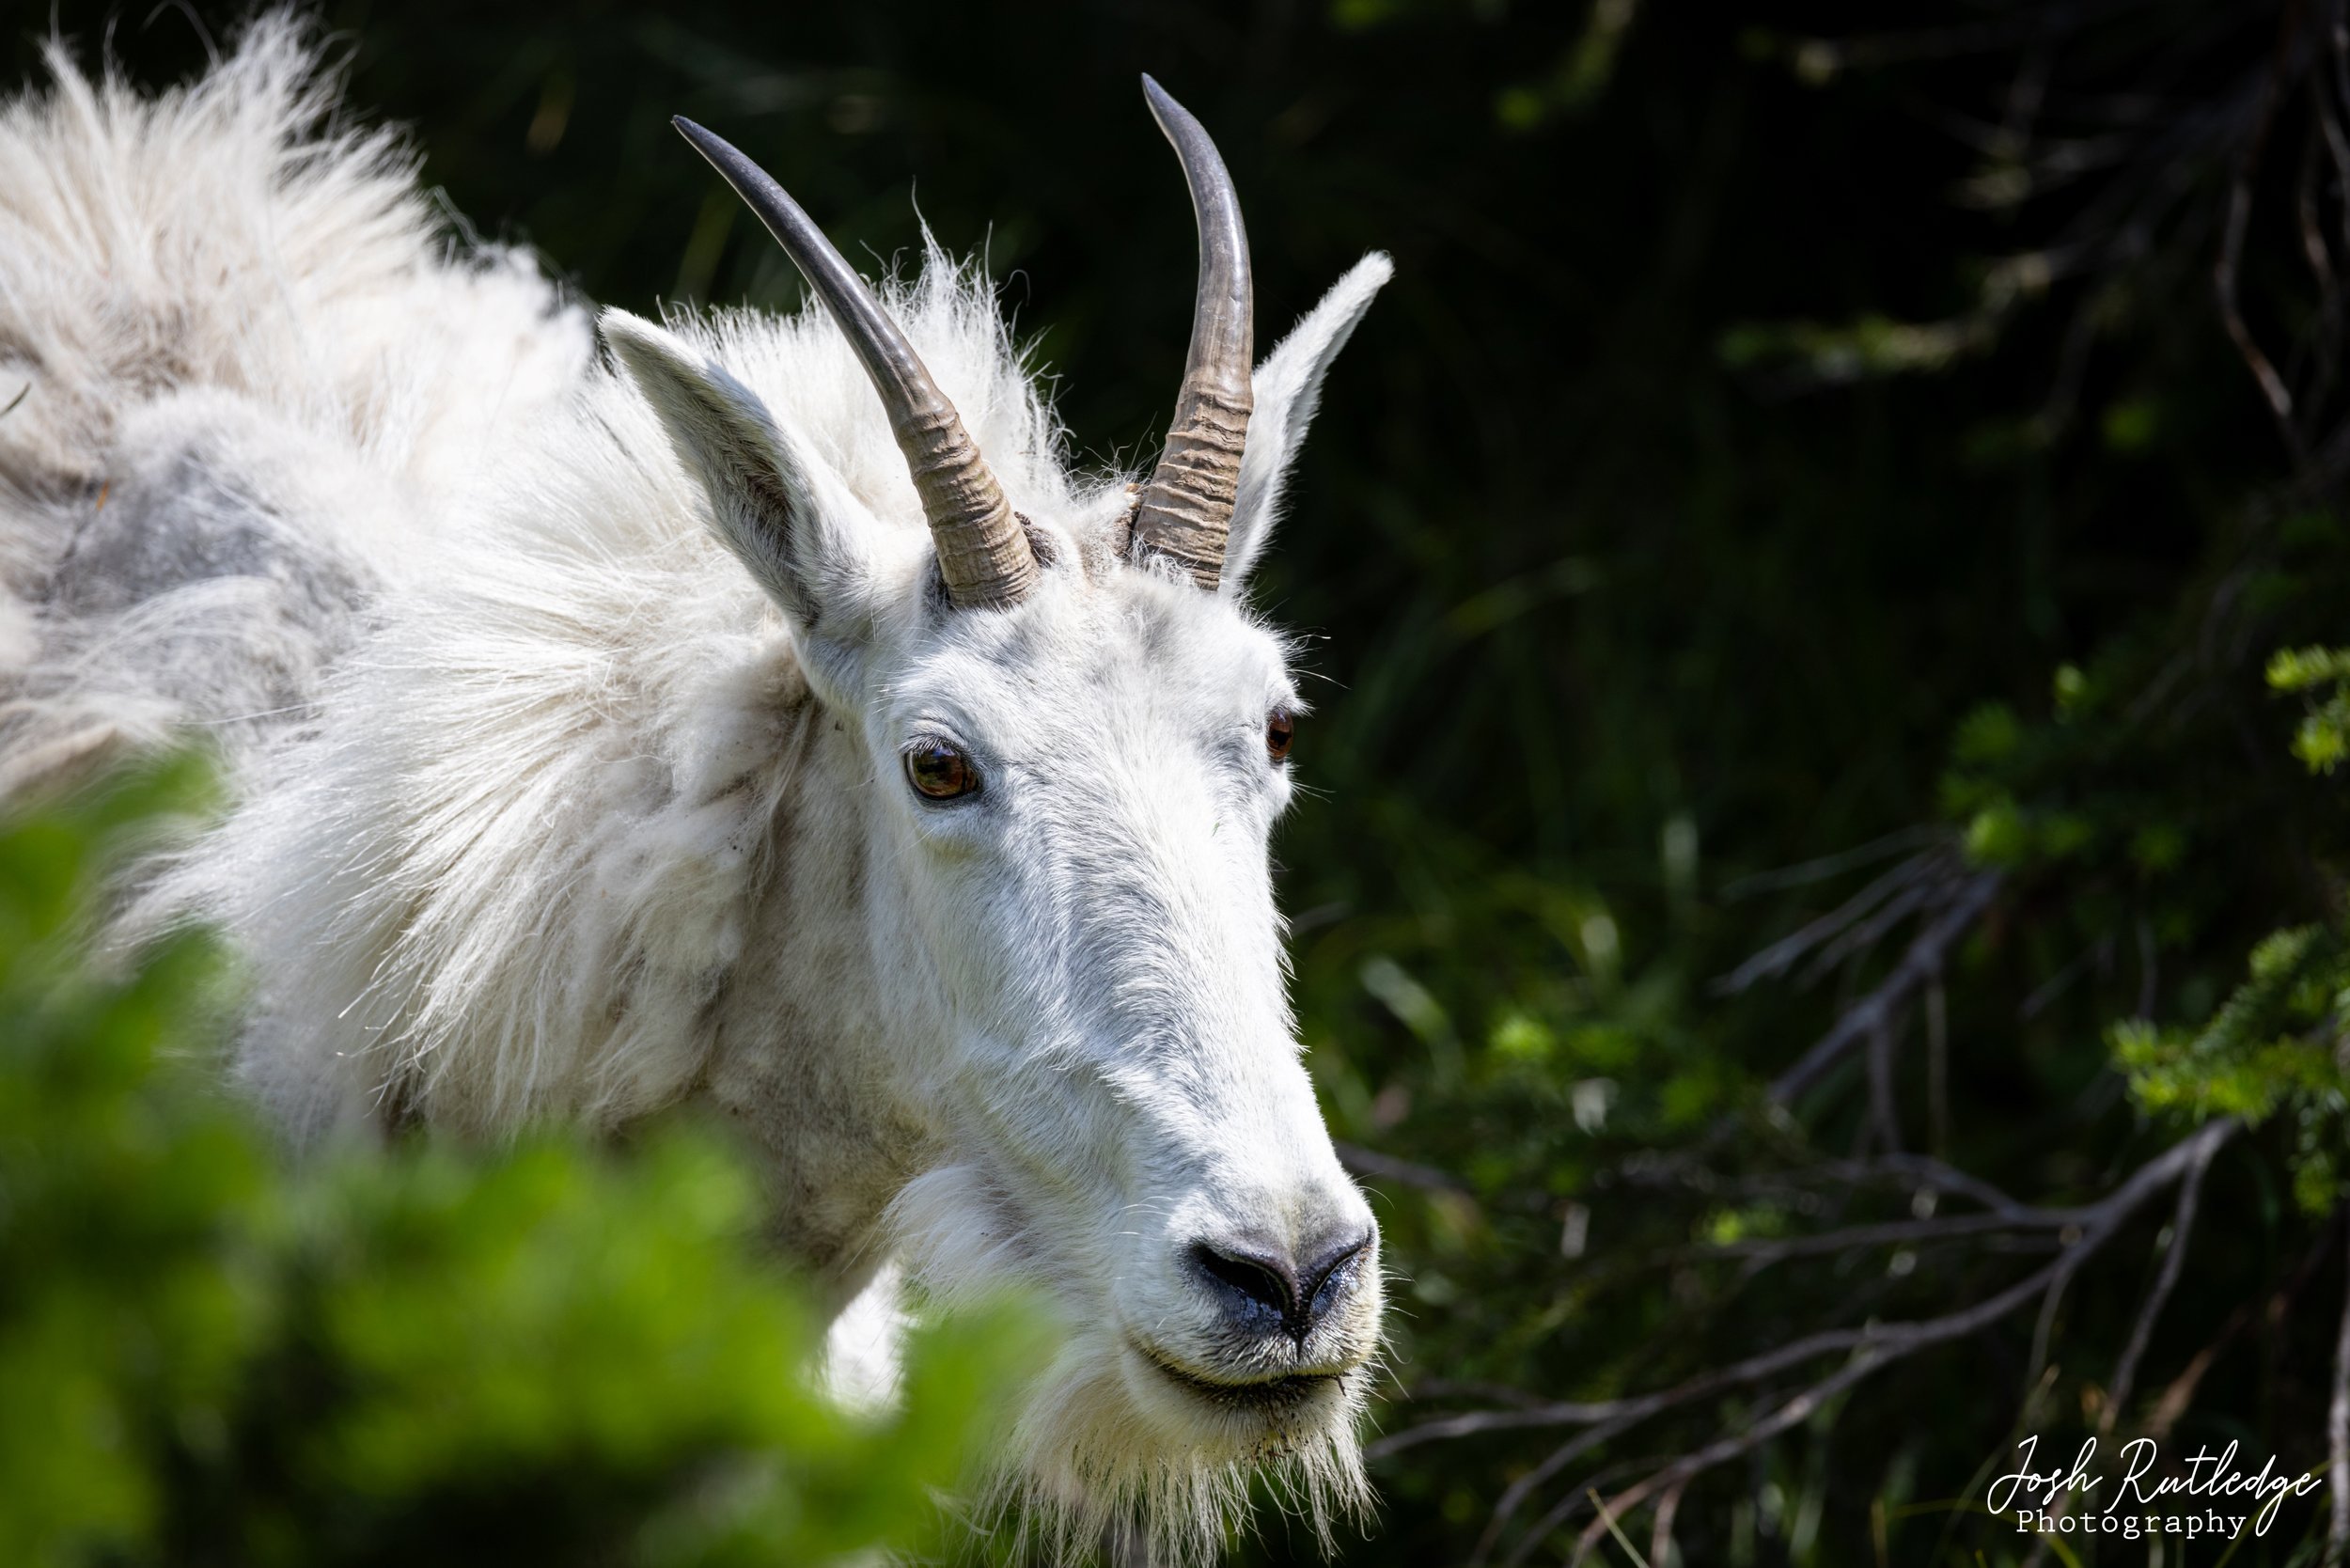
The lake itself reminded me a lot of Iceberg Lake. It has chunks of ice floating in it as well as the tall imposing cliffs behind it. The water is a bit more milky from the active glaciers however. And of course the water is freezy cold like Iceberg Lake as well. While we were sitting and enjoying the views, we were visited by a couple of Golden-mantled ground squirrels and some birds. So even though it was a somewhat barren landscape, it was not void of life. I think it is also possible to see mountain goats, but we did not the day we were there. As with all of the photographs in this blog, you can select the individual pictures for a larger view.

View fullsize Melissa with Grinnell Lake.
View fullsize Grinnell Lake
View fullsize A pano including Grinnell Lake.
View fullsize Waterfall from Salamander Glacier.
View fullsize Denise on the shore of Upper Grinnell Lake.
View fullsize The blue ice of Grinnell Glacier.

After enjoying the views, eating a quick snack and dipping our feet in the cold water, it was time to start the hike back down. On the way back down I spotted a young bull moose wading in the waters of Grinnell Lake below me. It was pretty cool to see. I was hoping to find a pika as well, as they have been on my list for a while to photograph. While I had some quick glances of a few, I was never able to get a great picture. Something for another day I guess. By the time we returned to the boat dock it had started to rain lightly. The weather can be very unpredictable so always go prepared for a variety of conditions. I had packed my lightweight rain jacket, so even though I hadn’t needed it all day I was glad I had it. There was already a fairly large group of folks waiting for the boat, so we actually had to wait a half an hour or so until the next boat came by.

A young bull moose wading in the shores of Grinnell Lake as seen above on the trail to Grinnell Glacier.

While it was a pretty strenuous hike, I think it is probably my favorite I have ever done so far in Glacier National Park. The views are just amazing and there is always a chance for wildlife and lots of wildflowers along the way. I would certainly add it to your list if you have not done it yet. For this hike I had along my Canon R5, the Canon RF 24-105 L lens, my Canon RF 100-500 L lens and my GoPro Hero 11 Black. I was using my small ThinkTank Backstory 13 as my backpack.

We were in Glacier National Park for a couple of days, so we also spent some time looking for wildlife and driving over the famous Going to the Sun Road. Here is a little photo gallery of some of the other photos I captured during this trip.

View fullsize 6D6A7841.jpg
View fullsize 6D6A7856.jpg
View fullsize 6D6A7872.jpg
View fullsize 6D6A8411.jpg
View fullsize 6D6A8574.jpg
View fullsize CB6A7441.jpg
View fullsize CB6A7453.jpg
View fullsize CB6A7517.jpg
View fullsize CB6A7591.jpg
View fullsize CB6A7698.jpg

Youtube video from our hike to Grinnell Glacier in Glacier National Park.

If you are interested in being notified when future blogs come out, please use my Contact page and let me know to add you to the email list.

For other information about Glacier National Park you may want to check out the following pages/posts on my website as well:

Dedicated page for Glacier National Park.

Blog - Hiking to Iceberg Lake in Glacier National Park

Blog - Glacier National Park Day 1, June 2022.

Blog - Glacier National Park Day 2, June 2022.

Blog - Glacier National Park Day 3, June 2022.

Blog - New Year - Catching up on Glacier Trips 2021.

Tags Glacier, Glacier National Park, Many Glacier, Grinnell Lake, Grinnell Glacier, Lake Josephine, Swifcurrent Lake, Nature, Wildlife, Photography, Canon R5, Canon RF 24-105, Canon RF 100-500, Hiking
1 Comment

A panorama of Iceberg Lake in Glacier National Park.

Hiking to Iceberg Lake in Glacier National Park

Joshua Rutledge February 11, 2024

This last July, 2023, my sister Melissa and I decided to hike to Iceberg Lake in Glacier National Park. It was a hike we had talked about doing many times before, but just never had, so we made it a point last summer to finally do it.

The sign at the Iceberg Ptarmigan Trailhead.

The trailhead for the hike leaves from behind the Swiftcurrent Motor Inn in Many Glacier on the east side of Glacier National Park. This is the same trailhead you would use if you wanted to hike to Ptarmigan Tunnel (Lake) or even locations passed there. There is a small parking area right at the trailhead, but it fills up quickly so you may need to park in the bigger parking lot in front of the Swiftcurrent Motor Inn and walk behind the cabins to the trailhead. There is also the option to hike from the Many Glacier Hotel as well, but of course that will add to the distance of your hike. As with all areas in Glacier National Park, I would recommend getting to the trailhead early, as parking anywhere close by might become impossible. Your other option is to wait until later in the afternoon when people have started to leave for the day, but make sure you leave yourself enough time to finish the hike. For the average hiker it is probably a 4 or 5 hour hike. Luckily the summer days in Montana are long. Also check on the reservation/ticketing requirements for the Many Glacier area as it tends to change year to year.

This area is home to many grizzly bears so I would be sure to bring along bear spray on your hike. We saw a grizzly bear within the first mile or so of the hike. It was a rather quick encounter so I was not able to capture any photographs or video of the bear. And we heard reports from other hikers that some others were spotted that morning as well. There are also a lot of moose in the area. As is always the case in Glacier National Park, the weather can be very unpredictable so be sure that you are prepared for a variety of conditions. It can be difficult to predict when the trail will be open year to year, but typically it is from late June/early July into early October. If you arrive too early in the season the trail might be closed all together, or there may be snow/ice fields you have to cross to get to the lake. Check with the rangers if you have any concerns about the hiking conditions or if the trail is open. Besides the weather, sometimes the trails are closed because of bear activity. The benefit of going earlier in the season is that there tends to be more “icebergs” in the lake than there are later in the season. But, if you wait and go in the fall you may be able to experience some fall colors and the crowds will be less. If you wait too late however, there may already be too much snow up high to get to the lake.

It is about a 10 mile hike round trip (assuming you leave from the trailhead at the Swiftcurrent Inn) with over 1,200 feet of elevation gain. I have seen different quotes between about 1,200 and 1,500 feet, so I am not sure what the correct elevation gain is. It is not a particularly challenging hike, some of the worst of it is actually the first quarter mile or so from the trailhead as it is a rather steep ascent up to where it meets the Ptarmigan Trail coming from the Many Glacier Hotel. Eventually it does even out some and from there it is a more continuous gradual elevation gain up to the lake.

Wildflowers and the Ptarmigan Wall near Iceberg Lake in Glacier National Park.

Some paintbrush flowers along the trail.

Some small white flowers on the trail to Iceberg Lake.

A Dusky Grouse we observed on the trail to Iceberg Lake.

As you hike, you will see some awesome vistas of the mountains and the valley below. Unfortunately the day we were hiking there was a lot of smoke from wildfires up in Canada, so some of our view was obstructed and it also added weird lighting to some of my photographs. Depending on the time of year, you will see a variety of wildflowers and animal species along the way. As I mentioned earlier, keep your eyes open for bears and moose especially. It is a very popular trail, so if you are uncomfortable hiking in bear country, ask if you can join some other hikers for safety in numbers.

Melissa crossing over the bridge that is just above Ptarmigan Falls.

About halfway through your hike you will find yourself at Ptarmigan Falls. Unfortunately you never get a great view of the falls due to the terrain. But you can see a pretty good portion of it through the trees. As you arrive above the falls, there is a nice rocky area that is a popular spot to rest and maybe have a snack. There is also a primitive pit toilet in the area as well. As you leave the falls, you will cross a wooden bridge and you will have a very good picturesque view up the valley and the creek running at your feet below into the falls. This is also the area where the trail splits to either continue on to Iceberg Lake or go up to Ptarmigan Lake/Tunnel. Stay to the left to go to Iceberg Lake.

The creek crossing just before you get to Iceberg Lake, with the Ptarmigan Wall in the background.

From there you will continue to climb for another couple of miles as you start to close in on the base of the Ptarmigan Wall and a small lake that is kind of an offshoot of Iceberg lake, I do not know if it has a name. While we were there, there was an amazing field of wildflowers surrounding the small lake. As you continue up the last little climb you will cross the creek again and you will start to get your first glimpses of where the lake will appear. After you step out of the last grove of trees, Iceberg Lake and the surrounding cliffs will be right in front of you. It is very difficult to capture just how imposing the cliffs are in front of you. You really have to see it to believe it.

Ice floating in Iceberg Lake in Glacier National Park.

Of course we stayed at the lake for some time. We dipped our tired feet in, and it was VERY cold. For a second the cold water felt good, but it quickly became too cold for me. I have seen pictures of people swimming in the lake, but no one was brave enough the morning we were there, but lots of people did wade out into the frigid waters. We ate a snack, rested for a little bit, enjoyed the views and then started the hike back down. Since we had got a pretty early start, we passed a lot of people coming up the trail as we were going down. I was glad we got there early to avoid the crowds.

Another panorama of Iceberg Lake in Glacier National Park.

Despite the smoky conditions, the hike was awesome. Next time I may have to try the Ptarmigan Tunnel trail, as I have heard there are some spectacular views from there as well. I know some people have completed both sections of the trail in a single day, but I am not in good enough shape to do that. Later in the summer of 2023, we also did a hike to Grinnell Glacier which was also amazing. Both hikes are awesome, but I think the Grinnell hike might edge out Iceberg Lake, but only by a little bit, as my favorite. I will write a blog about our hike to Grinnell later on, so please check back.

We were actually in the park for a couple of days on this trip, so here are some pictures from the rest of our time in the park. For our hike I had my Canon R5, Canon RF 24-105, Canon RF 100-500 and my GoPro Hero 11 Black. I also had my Canon 600 F4 version 2 lens along for this trip for wildlife when not on our hike. As with all of the pictures in the blog, you can select the image for a larger pop out view.

View fullsize 6D6A3263.jpg
View fullsize CB6A0068.jpg
View fullsize CB6A0163.jpg
View fullsize CB6A0173.jpg
View fullsize 6D6A3044.jpg
View fullsize 6D6A3048.jpg
View fullsize 6D6A3057.jpg
View fullsize 6D6A3096.jpg
View fullsize 6D6A3110.jpg
View fullsize 6D6A3161.jpg
View fullsize 6D6A3374-Enhanced-NR.jpg
View fullsize 6D6A4065.jpg
View fullsize 6D6A4098.jpg
View fullsize 6D6A4190.jpg
View fullsize 6D6A4195.jpg
View fullsize 6D6A4241.jpg
View fullsize CB6A0241.jpg
View fullsize CB6A0399.jpg

If you are interested in being notified when future blogs come out, please use my Contact page and let me know to add you to the email list.

For other information about Glacier National Park you may want to check out the following pages/posts on my website as well:

Dedicated page for Glacier National Park.

Blog - Glacier National Park Day 1, June 2022.

Blog - Glacier National Park Day 2, June 2022.

Blog - Glacier National Park Day 3, June 2022.

Blog - New Year - Catching up on Glacier Trips 2021.

Tags Iceberg Lake, Glacier National Park, Many Glacier, Ptarmigan Falls, Hiking, Swiftcurrent, Canon, Canon R5, Canon RF 24-105, moose, grizzly bear, wildflowers
1 Comment

Stonehenge, unfortunately it was a bright, blue sky day so there was not a lot of drama in the scene. I was able to get a shot with no fellow tourists in it though.

The British Isles

Joshua Rutledge August 30, 2022

I recently returned from a two week trip around the British Isles. It was an amazing trip. We saw areas around London, Guernsey, Ireland, Northern Ireland, Wales, Scotland, the Shetland Islands, the Orkney Islands and many other locations in between. We had so many stops it would be almost impossible to list them all. I would love to write blogs about all of the locations, but with things being so busy at my day job, I don’t really have time for that right now. Maybe later this fall/winter when I have more time in doors I can sit down and do some longer posts from the various locations. Leave a comment below if there is something you are most interested in hearing about. Hopefully my memory will not have faded by then. I think this post is going to be more of a gear overview and some insight into the photography aspects of the trip. I don’t usually write a lot of posts about gear, but this time it seems appropriate. While this was not actually a photography trip (it was a family vacation) I still did my best to get as much photography in as I could. Of course compromises were made since it was a vacation for everyone; I was not always able to optimize the photographic opportunities, but I did my best.

Kitchener Memorial above the cliffs on the Orkney Islands, Scotland.

While planning for the trip I REALLY struggled with what equipment to bring (or maybe harder yet, what NOT to bring.) With so much travel involved, small planes, large planes, ships, small boats, trains, cars, buses and etc, I knew I had to keep my kit as light and portable as possible. That immediately eliminated any thoughts of bringing things like tripods or larger lenses such as my 600mm F4. Knowing I was also going to be carrying whatever I brought around on my back most of the time, meant I also needed a good backpack and needed to keep the weight to a minimum. 

In the end I settled on only bringing just two lenses and two camera bodies. I also purchased a new smaller backpack for the trip as well. Besides being smaller, the backpack was also built with security in mind, since I was concerned about the safety of my gear while traveling. In my kit I ended up with my Canon RF 24-105 L F4 lens, the Canon RF 100-500 L lens, my Canon R5 as my main camera body and a Canon R6 as my backup body. I also brought along 2 sets of spare batteries and multiple memory cards, both CF-Express and SD. I also had my Peak Designs Capture Clip attached to my backpack strap and plates on both cameras. Typically I like to shoot with a battery grip on my cameras, but I left them at home to save weight and space. This did mean I felt like I was having to change out batteries a lot faster than I am used to. The backpack I chose for the trip was a ThinkTank Backstory 13. I also had my GoPro Hero 8 Black with me, but I found I did not use it very often. I did do a test run of basically this exact kit when we did our Our Lake hike I talked about in my previous blog. So I did have some idea how everything was going to work. 

An idea of the layout of my camera bag, with my two lenses, two bodies and accessories. I used the rain cover (blue pouch) as kind of a buffer between things.

My Peak Designs Capture clip attached the strap on my camera bag.

The idea of only having two lenses along did concern me. I was not sure if I would be able to do everything I wanted. My biggest concerns were being able to go wider than 24mm (I would have liked to have had my 16-35mm a few times) and I was also concerned about only having an F4 lens and not having something a little faster like most of my F2.8 lenses. This ended up being less of an issue for me, although there were a few times another stop of light would have been nice. I knew the Canon 24-105 was going to be a compromise, but when considering my options it also seemed like the most versatile choice. In the end, I was very happy with the lens. I had only purchased the lens this spring, so I had not had a lot of time to try it out. The 24-105 is a lens I like to use for video. I have the older EF version and have used that for many years on my DSLRs, but I wanted the RF version so I did not need to bring any extra adapters. I have not done a side by side comparison, but it seems to me the RF version is better than the old EF version so I think it was a good investment. I really only used my old EF 24-105 as a video lens as I mentioned, since I would normally choose a different lens for photography. I also picked up the Canon RF 100-500 this spring which I have mentioned in other posts. That lens was also purchased to try and have something that was the native RF mount and I also like the idea of having the extra 100mm’s over my old Canon 100-400mm version 2. I am still not sure I like the 100-500 as much as my old 100-400. I did occasionally have some focusing issues with the 100-500 lens. I am guessing most of that is just because of the slower aperture on it. I was still able to get some good shots, but I have not been blown away by the lens so far. But as I said, it does give me some extra reach and does not require any extra adapters, so I think it was still the right choice for this trip. 

A puffin getting ready to take flight from the cliffs in the Shetland Islands, Scotland.

Overall I was happy with my backpack. It is on the smaller side, but that was intentional. I like that the main zipper compartment is on the inside (against your back) so I was less worried about security when we were in crowds. It is also nice when you need to take your pack off, you can lay it down in the dirt or wet and when you put your pack back on, the dirty side is not against your back. The pack comes with a rain cover, but we had unseasonably hot/dry weather most of the time, so I never needed to use it. The one day we did have significant rain, I still did not have any issues and I did not bother putting on the cover. I also enjoyed having my Peak Design Capture clip on it as well. It was very handy to sometimes be able to clip my camera on and have my hands free. I was a little self-conscious about having my camera so visible when we were in busier areas, so sometimes I did stop and put it back into my pack just to not draw attention. But when we were in more remote areas, I used it a lot. I did notice that if I wore my camera on my pack strap for extended periods of time, it did start to get kind of sore on that shoulder. I was able to adjust my straps and make sure I kept the weight balanced in my pack as much as possible and that did help.  

Giant’s Causeway in Northern Ireland.

I used my Canon R5 more than 90% of the time. I really only used my Canon R6 when I was actively going back and forth between a wider shot and a longer telephoto composition. I left my 24-105 on my camera 90% of the time too. I only got out the 100-500 when I had some wildlife shots or if there was a subject like a lighthouse or something farther out I wanted to bring in closer. I was having some issues with my R6 that further reduced me wanting to use it. I was getting some memory card read issues and I kept having to reboot the camera until the error went away. This never happened while using the camera at home. And since being back I have not had it either (although I have not used it a lot since being home yet.) But it was consistently happening over there. I don’t know if it was a memory card or the camera itself. The camera has dual memory card slots and I was using cards in both slots, so that makes it a little harder to troubleshoot. My pictures/videos were all fine on the memory cards though, so that was good. I will have to do some more experimenting if I am able to recreate the problem. I am hoping maybe it was just a bad memory card, that would be easier to resolve than an issue with the camera itself. 

Portrait of a highland cow in Scotland.

Hopefully that gives you a little overview of my setup and my thoughts about things. I certainly do not consider myself a “travel photographer,” but I was traveling and doing photography so I guess take my suggestions for what they are. This blog is already getting kind of long, so I guess I will end it here. If you have any questions about the gear I used or particular places we visited, feel free to reach out. And hopefully I will be posting more detailed blogs about the trip as I get more time. Check back to see those posts and hopefully some others now that we are getting into the fall months. 

A bagpiper in front of Blarney Castle.

Tags British Isles, Canon R5, Canon R6, Canon RF 24-105, Canon 100-500 RF, Peak Designs Capture, ThinkTank Backstory
Comment

Search Posts


Featured Posts